How to use Flowdesk
A step-by-step guide for team members, clients and admins.
Welcome to Flowdesk
Flowdesk is where your team plans work, tracks it to completion and talks about it, all in one place. This guide shows you how to do everyday things in the web portal and the mobile app. The screenshots use a made-up workspace called Acme Studio.
- Organise work into projects and tasks, and see it as a list, a board, a calendar or a timeline.
- Plan with sprints and milestones, and set up automations that do routine steps for you.
- Chat with colleagues in channels and direct messages, and see who is online.
- Get notifications in the app, by email and on your phone.
- Keep files together in Documents, and follow progress in Reports.
Getting started
You need an account in a Flowdesk workspace. Your admin creates it by inviting your email address.
Set your password from the invitation
- Open the email titled "You're invited to ... on Flowdesk".
- Select Set your password.
- Type a password of at least 8 characters twice and select Set password.
- Go to the portal and sign in with your email and the new password.
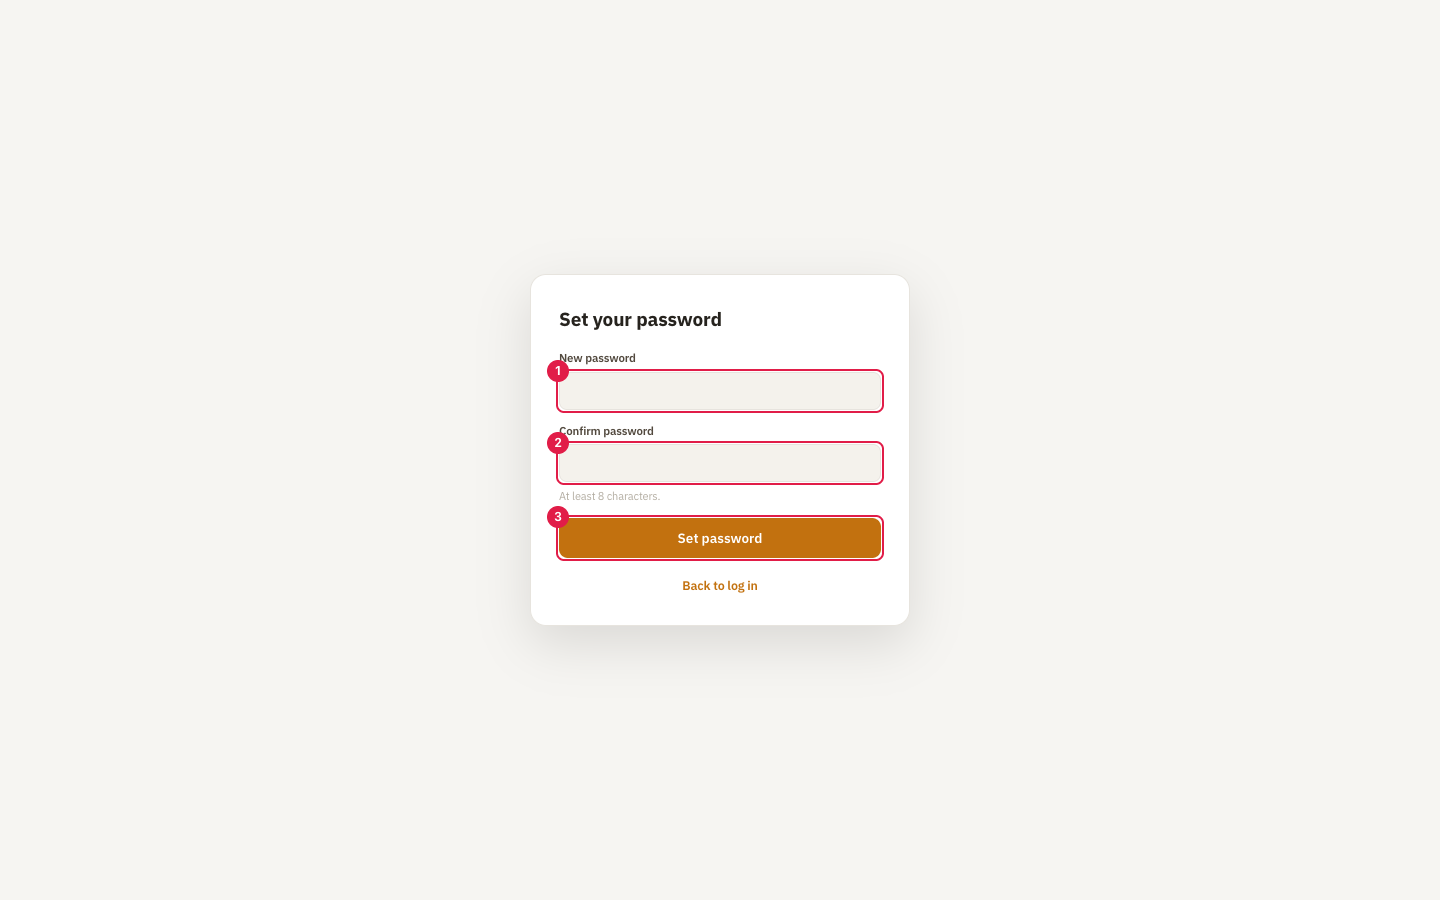
- 1New password (at least 8 characters)
- 2Type it again to confirm
- 3Select Set password
The link works once and expires after 7 days. If it has expired, use Forgot password on the sign-in page, or ask your admin to send a new invitation.
Sign in
- Open the portal address your admin gave you.
- Enter your email and password. The eye icon in the password box shows what you typed.
- Select Log in.
- If you turned on two-factor sign-in, enter the 6-digit code from your authenticator app.
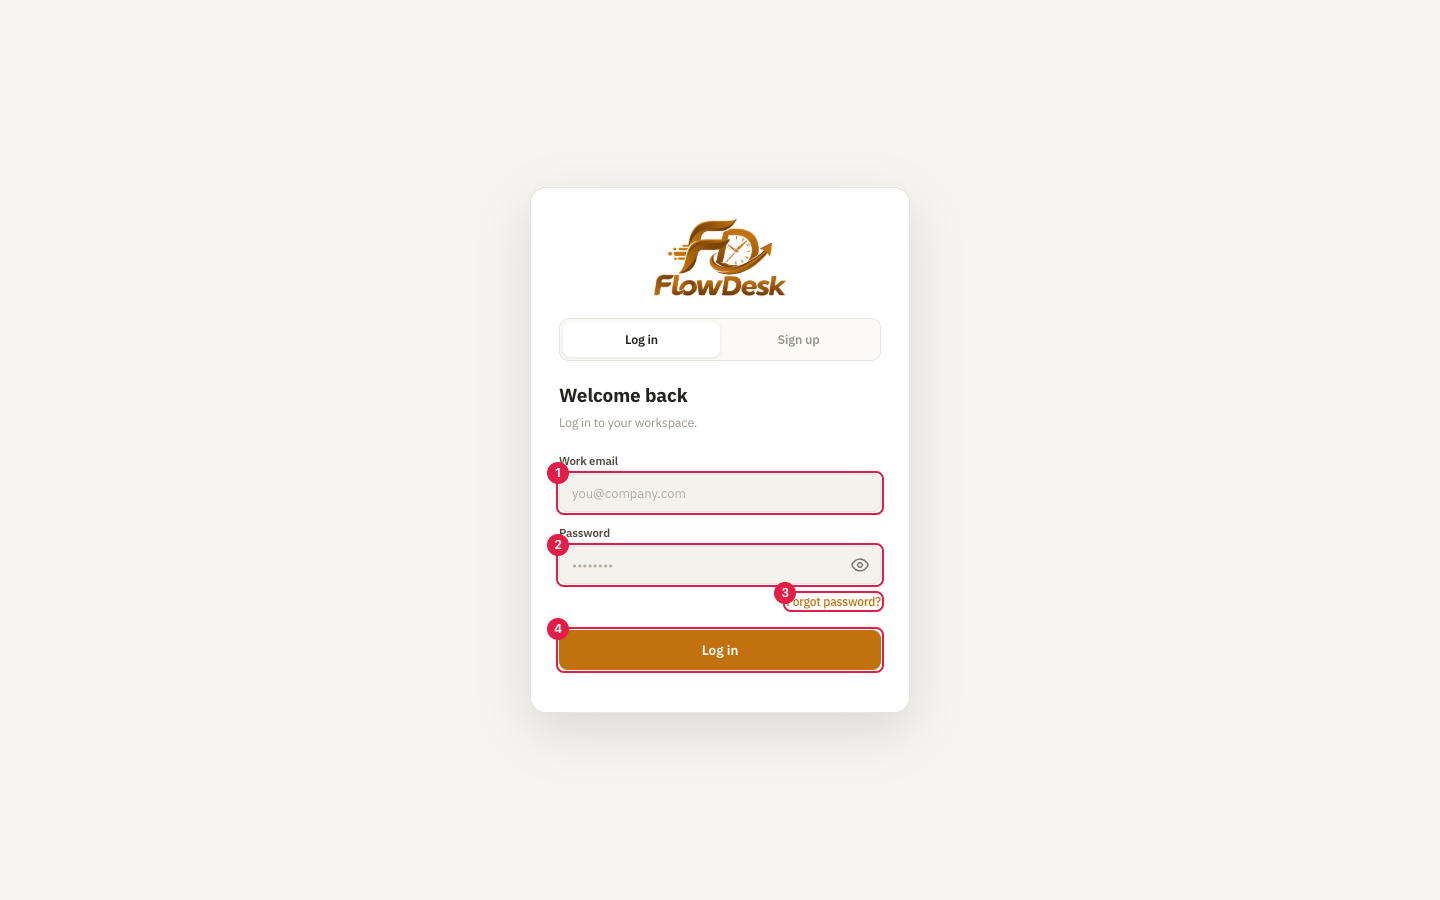
- 1Your work email
- 2Your password
- 3"Forgot password?" sends you a reset link
- 4Log in
After several wrong attempts the portal makes you wait a few minutes before you can try again. This protects your account.
Forgot your password
Select Forgot password? under the password box, enter your email and open the message we send you. The link is valid for 1 hour. For privacy the portal gives the same answer whether or not the email has an account, so check the address if nothing arrives.
Confirm your email
If a banner at the top asks you to confirm your email address, follow the link in the message we sent, or select Resend email. Setting your password from an invitation also confirms your address.
Switch workspaces
The workspace name is at the top of the left sidebar. If you belong to more than one workspace, for example your own team and a client's, select it to switch. Projects, tasks and chat always belong to the current workspace.
Finding your way around
The left sidebar is your map. What you see depends on your role in the workspace.
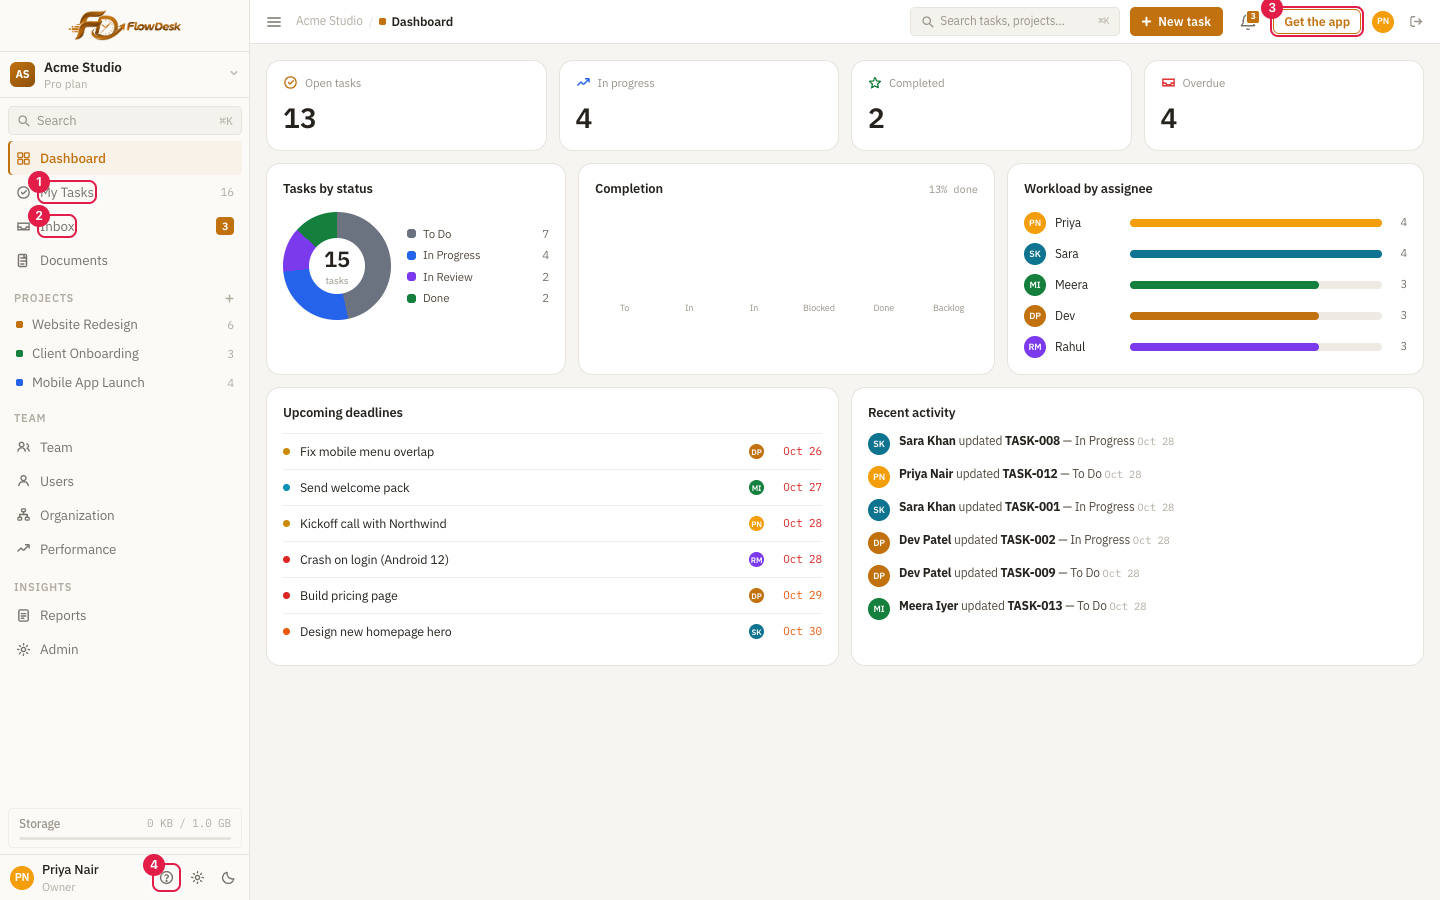
- 1My Tasks: everything assigned to you
- 2Inbox: chat and notifications, with a badge when something is unread
- 3Get the app: download the mobile app
- 4User guide: opens this guide
| Sidebar item | What it is for | Who sees it |
|---|---|---|
| Dashboard | Your overview: open, overdue and completed tasks, deadlines and activity | Everyone |
| My Tasks | Every task assigned to you or created by you | Everyone |
| Inbox | Chat (channels and direct messages) and your notifications | Everyone |
| Documents | Files attached to tasks and sent in chat | Everyone |
| Projects | Your workspace's projects, each with its own page. The + beside the heading creates one | Everyone (only owners and admins create projects) |
| Team | Team members and how much work each one has | Everyone |
| Users, Organization, Performance, Reports | Manage people and departments; delivery statistics; progress reports | Owners and admins. Performance and Reports also need the Business plan |
| Admin | Workspace settings, statuses, labels, integrations, automations, billing | Owners |
| Gear icon | Your own profile, notifications and security | Everyone |
Dashboard
The dashboard shows open, overdue, in-progress and completed tasks, then tasks by status, workload by assignee, upcoming deadlines and recent activity. In a brand-new workspace it offers shortcuts to create a project, add a first task and invite your team.
My Tasks
My Tasks gathers your work from every project, grouped as Overdue, Due today, This week and Later. Switch between List, Board and Calendar, then sort, group and filter. Use Group at the top right to group the list by Due date, Status or Project; the page remembers your choice. Tick the box beside a task to mark it complete.
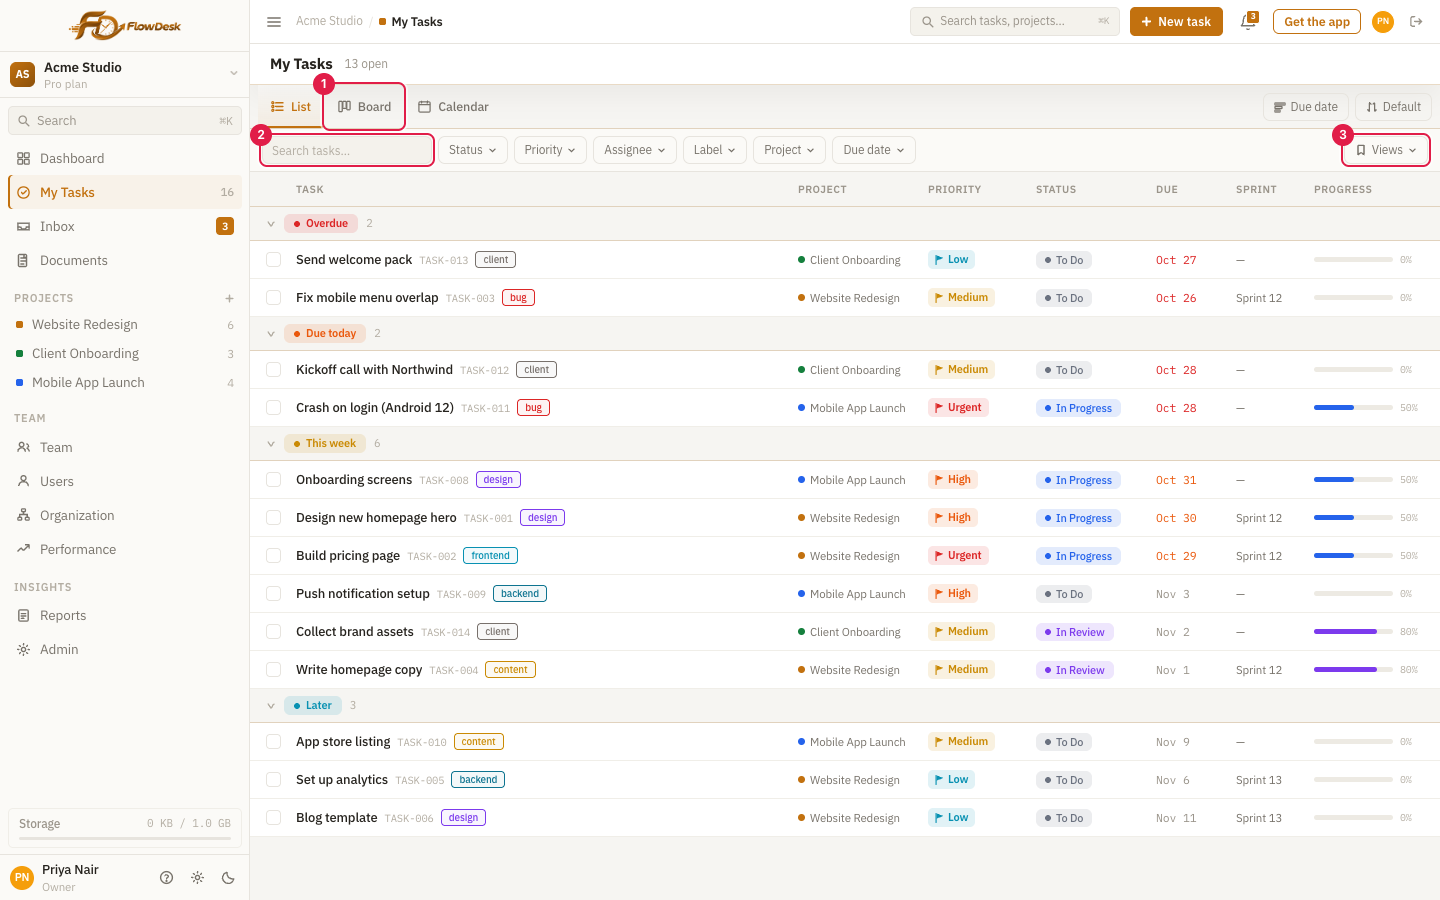
- 1Switch between List, Board and Calendar
- 2Search by title or task key
- 3Saved views: your favourite filters in one click
Search and keyboard shortcuts
Press Ctrl+K (Cmd+K on a Mac) or / to search tasks, messages and people, or to jump straight to a page or project. These shortcuts work whenever you are not typing in a field:
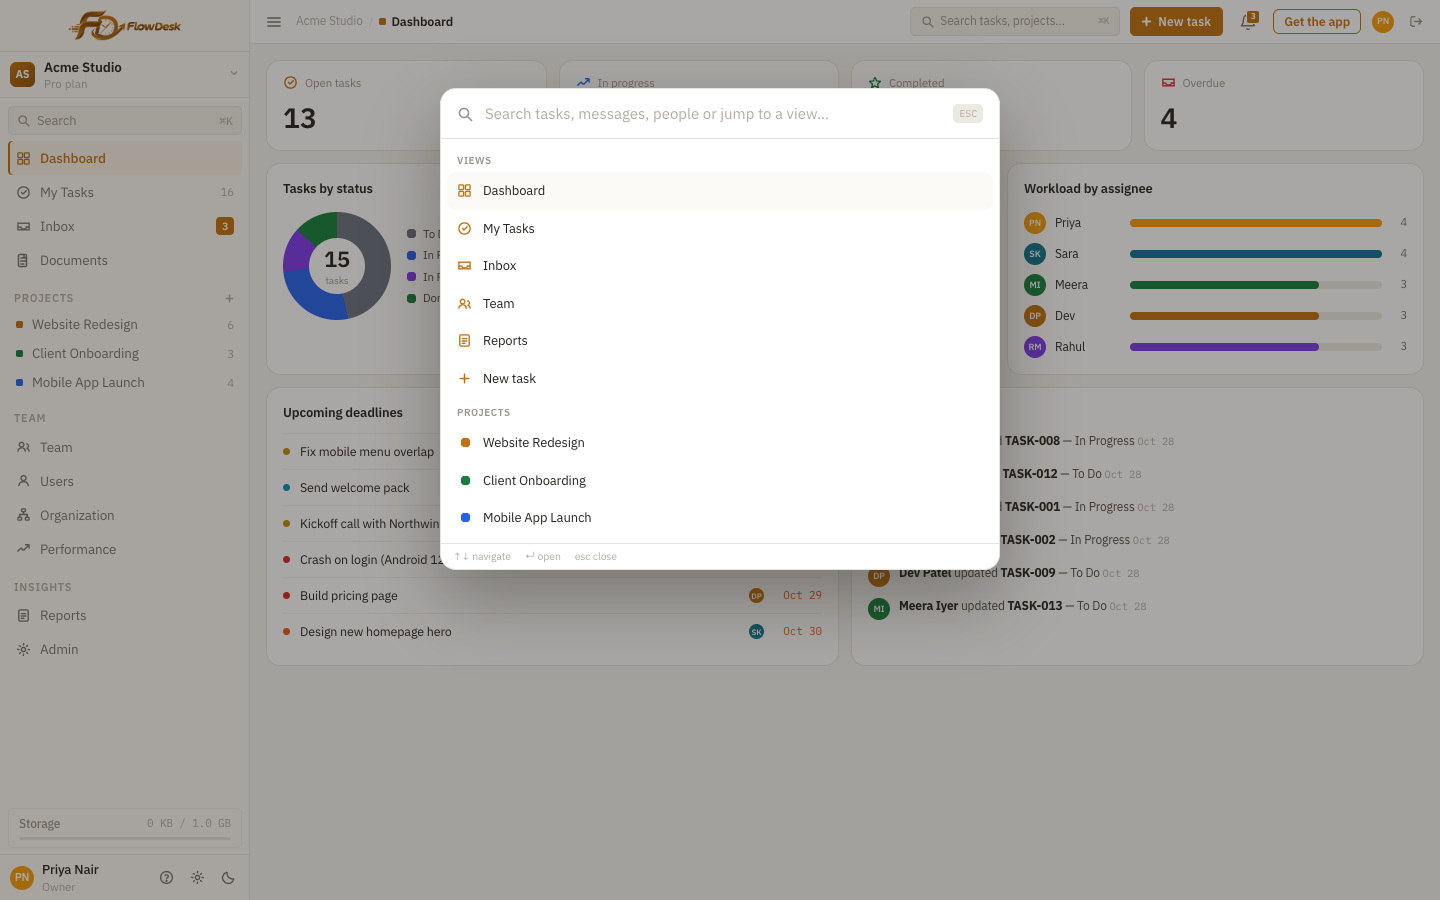
| Keys | What happens |
|---|---|
| N | Create a new task |
| / or Ctrl/Cmd+K | Open search |
| G then D | Go to Dashboard |
| G then M | Go to My Tasks |
| G then I | Go to Inbox |
| G then T | Go to Team |
| G then R | Go to Reports |
Press G, then the second key within about half a second.
Projects and tasks
A project holds the tasks for one piece of work. A task is one thing to do, with an owner, a status, a priority and usually a due date. Each task gets a short key such as TASK-014 so you can refer to it in chat.
Create a task
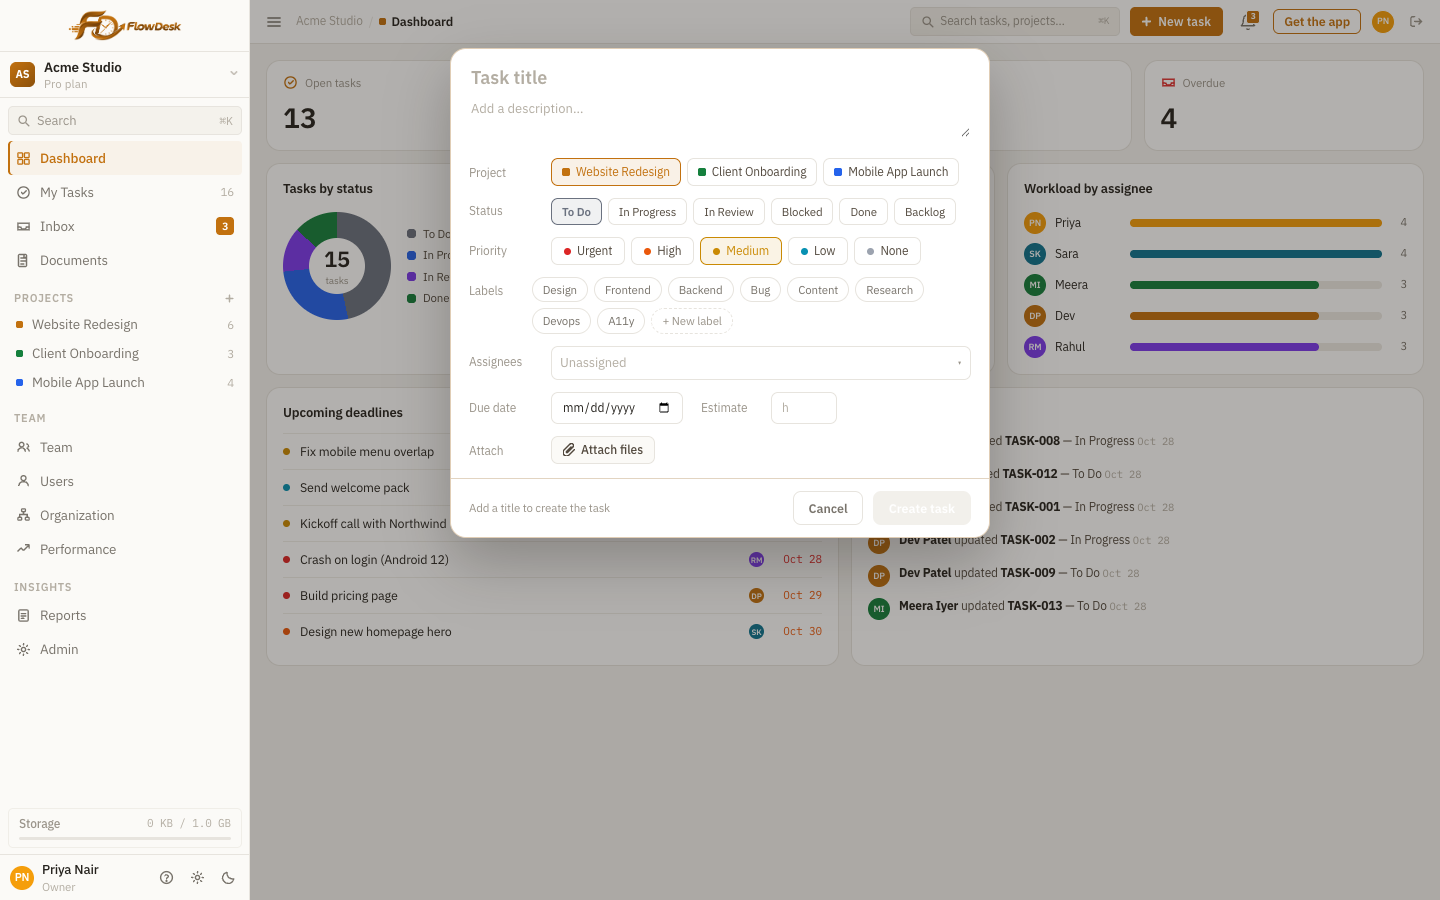
- Press N, or choose New task at the top of any page.
- Type a title. Pick the project, status, priority and labels. Optionally add a description, assignees, a due date, an estimate and files.
- Select Create task. It appears in the project and in the assignees' My Tasks.
Open a task
Select a task to open its detail panel. From there you can change anything about it:
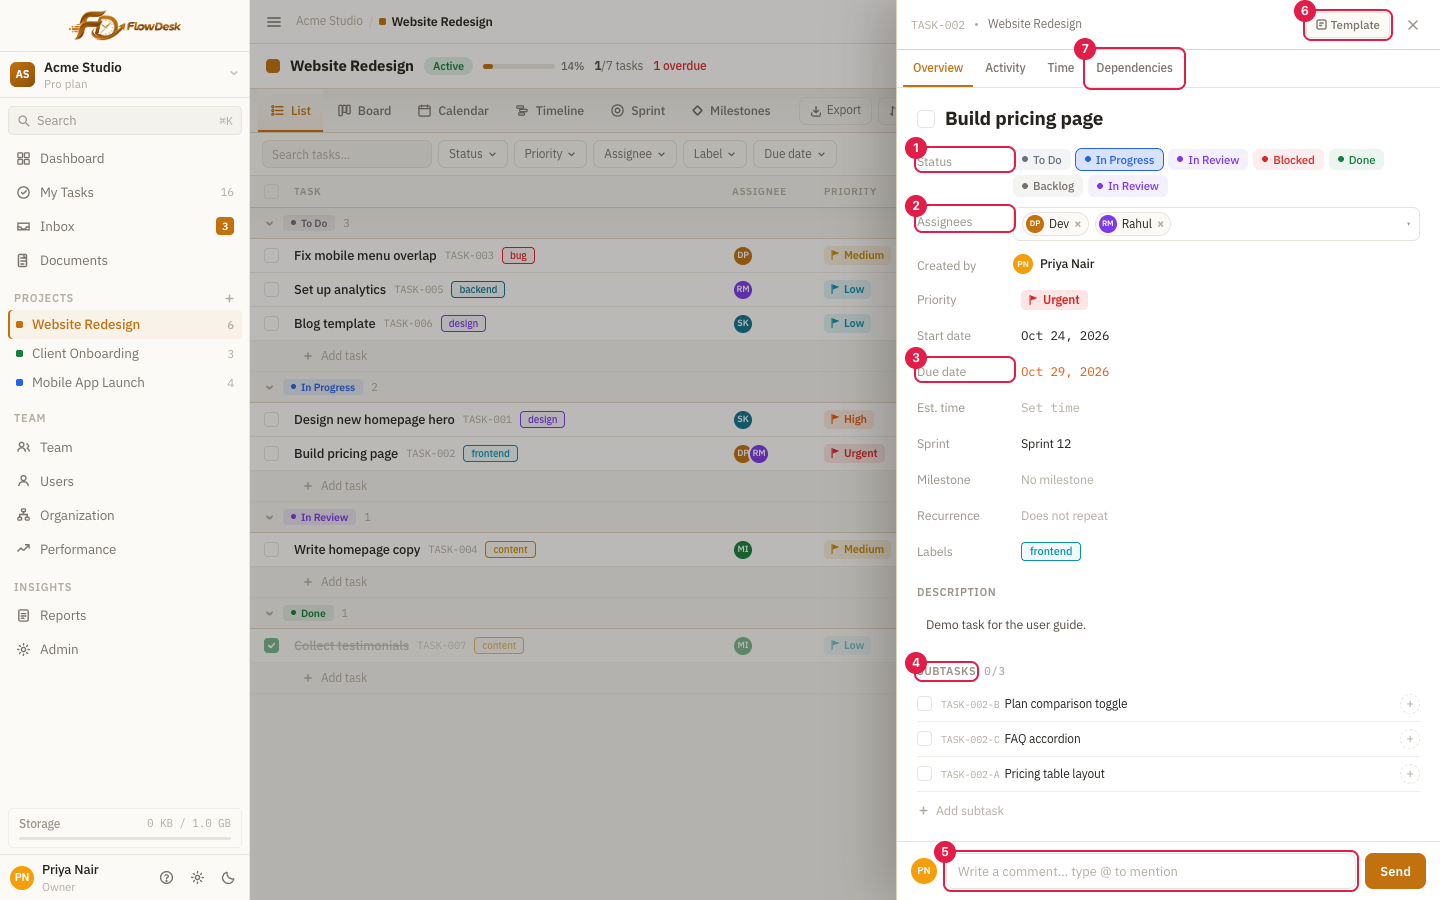
- 1Status: one click to move the task along
- 2Assignees: one or several people
- 3Due date (the start date, estimate, sprint, milestone, recurrence and labels sit just above and below)
- 4Subtasks: smaller steps you can tick off
- 5Comments: type @ and a name to mention a colleague
- 6Template: save this task as a reusable template
- 7Dependencies: what blocks this task and what it blocks (Activity and Time are the neighbouring tabs)
- Status and priority (Urgent, High, Medium, Low or None).
- Start date, due date and an estimate in hours. The Time tab lets you log the hours you spent.
- Labels to group tasks, for example "bug" or "design".
- Sprint and milestone the task belongs to.
- Recurrence: repeat the task on a schedule, with an optional end date.
- Subtasks: break a task into smaller steps. Type a title and, if you like, a short description, then select Add. A subtask is a task in its own right: select its title to open it in the same panel and set its assignee, priority, dates and description, then use Parent task to go back.
- Dependencies: mark what a task is blocked by and what it blocks.
- Custom fields your admin has added, such as client name or budget code.
- Comments and Activity: discussion on the task, and a history of changes such as who moved the status and when.
Statuses
Tasks move through stages, for example Backlog, To Do, In Progress, In Review, Blocked and Done. Your workspace owner can change the list of stages in Admin, so yours may differ.
Project views
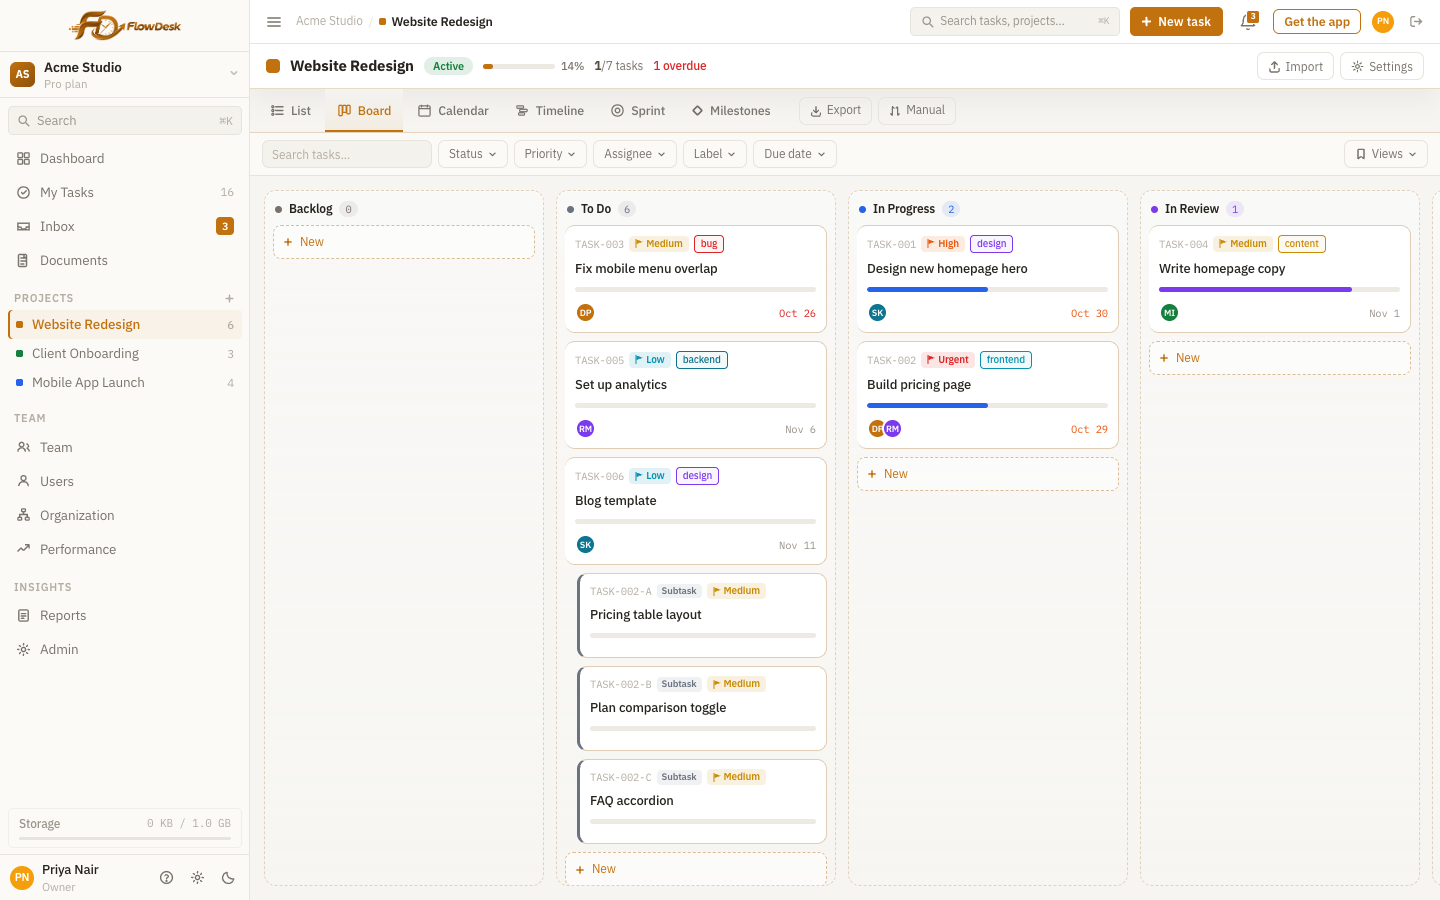
Open a project from the sidebar and choose how to see its tasks with the tabs under the project name. The tasks are the same in every view. Export downloads them as a CSV file, Import brings tasks in from a file, and Settings edits the project itself.
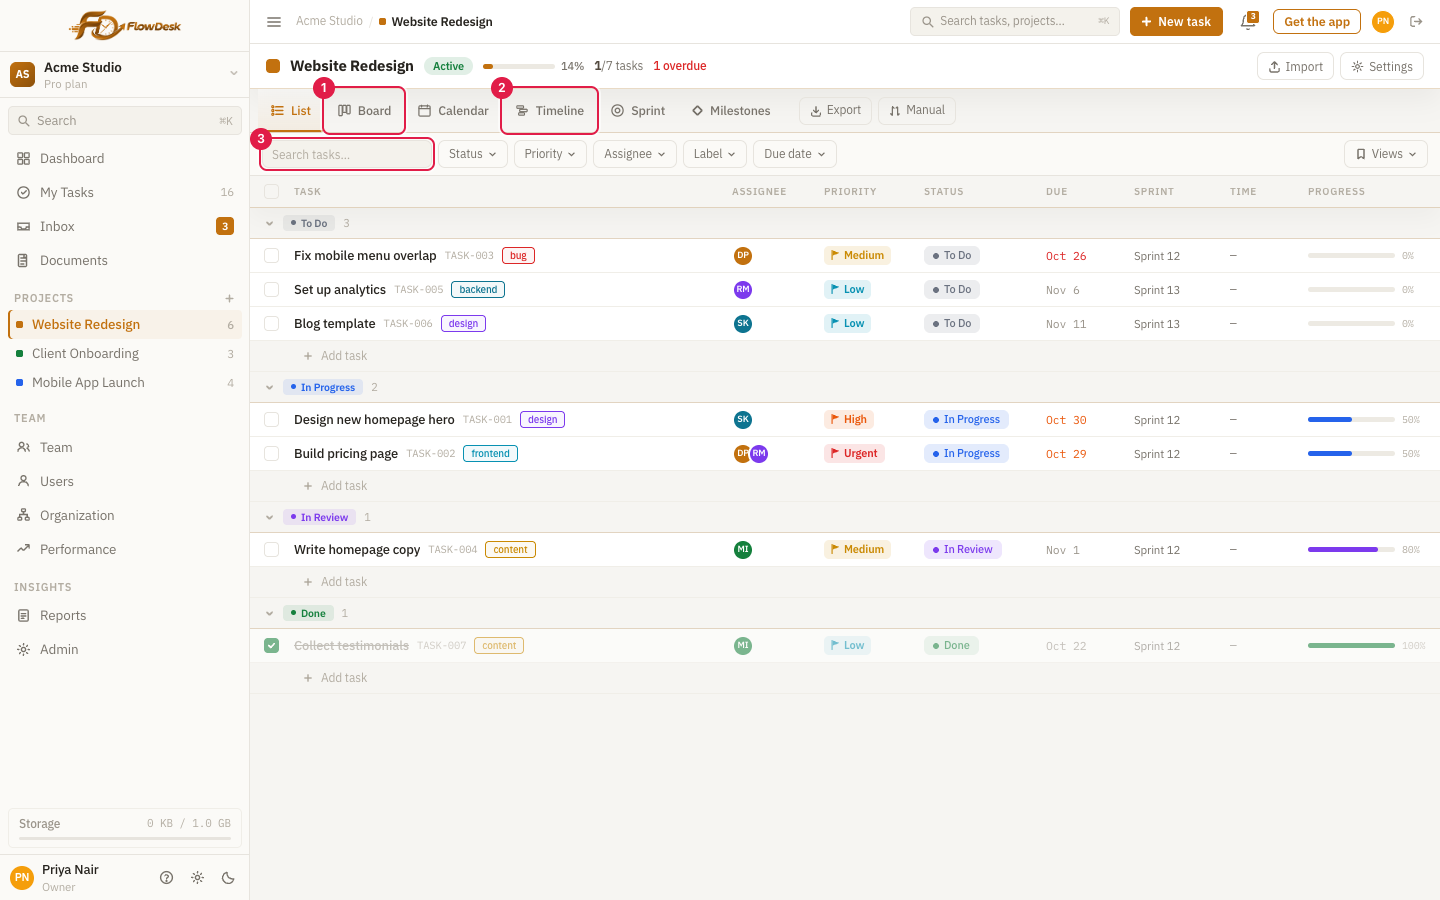
- 1Board view
- 2Timeline view
- 3Search and filters (see the next section)
| View | Best for | How to use it |
|---|---|---|
| List | Working through tasks | Tasks are grouped by status. Subtasks get their own row, marked with an arrow, right under their parent. Tick the box to complete a task. Use Add task under a group to add one quickly. |
| Board | Seeing flow at a glance | One column per status. Drag a card to another column to change its status. |
| Calendar | Deadlines | Tasks appear on their due dates. Use the arrows to move between months and Today to come back. |
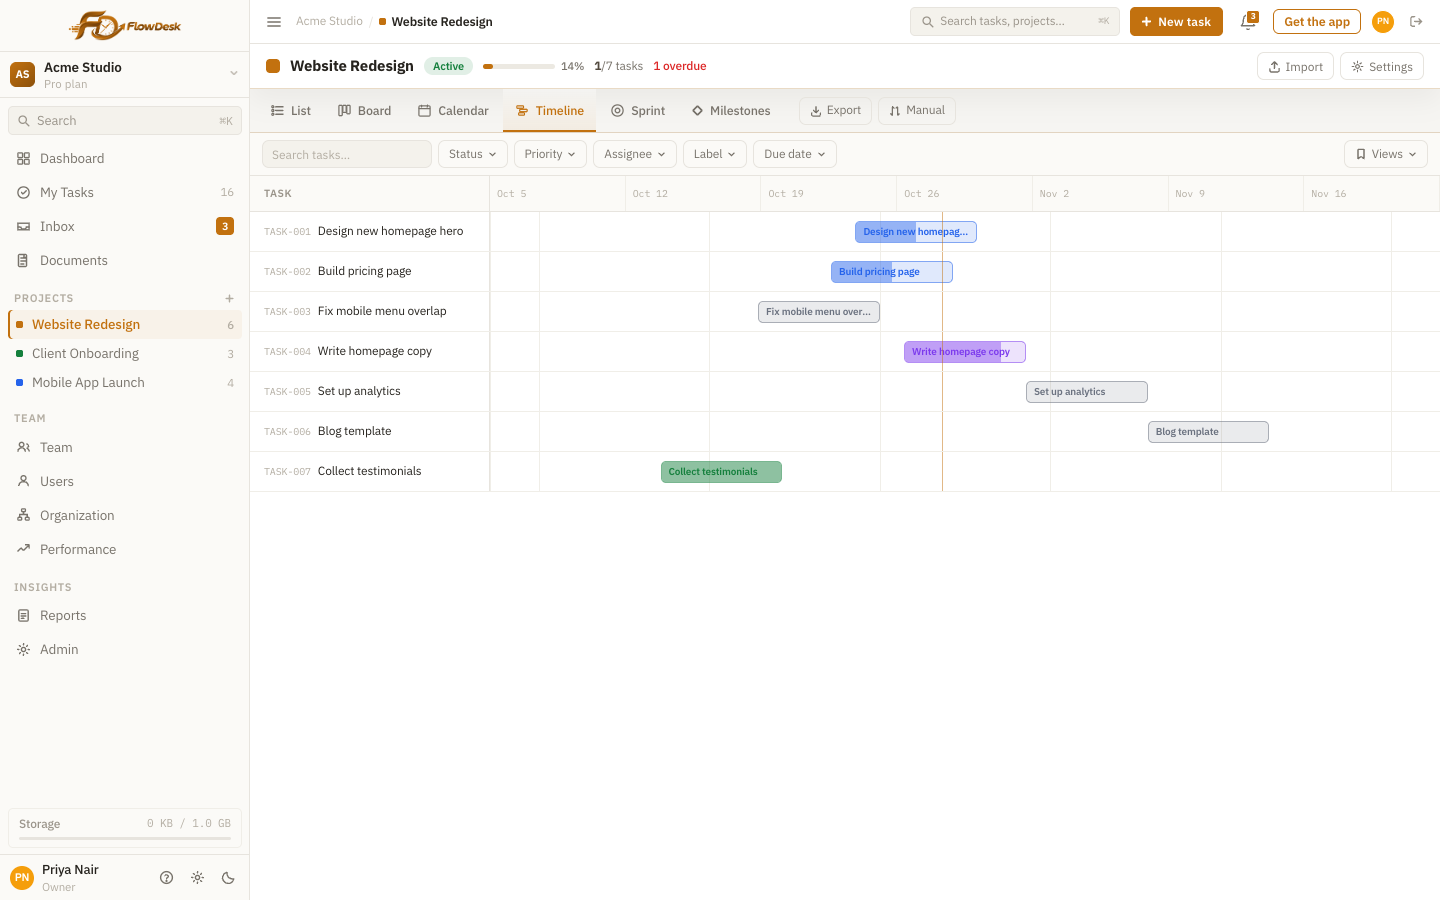
| Timeline | Scheduling and overlaps | A bar for each task from its start date to its due date. Give tasks a start date so they show as bars. |
| Sprint | Planning in short cycles | Create sprints, drag tasks into a sprint, and follow the burndown chart. A sprint is Planning, Active or Completed. |
| Milestones | Key dates and goals | Add milestones with a date, and group tasks under them. |
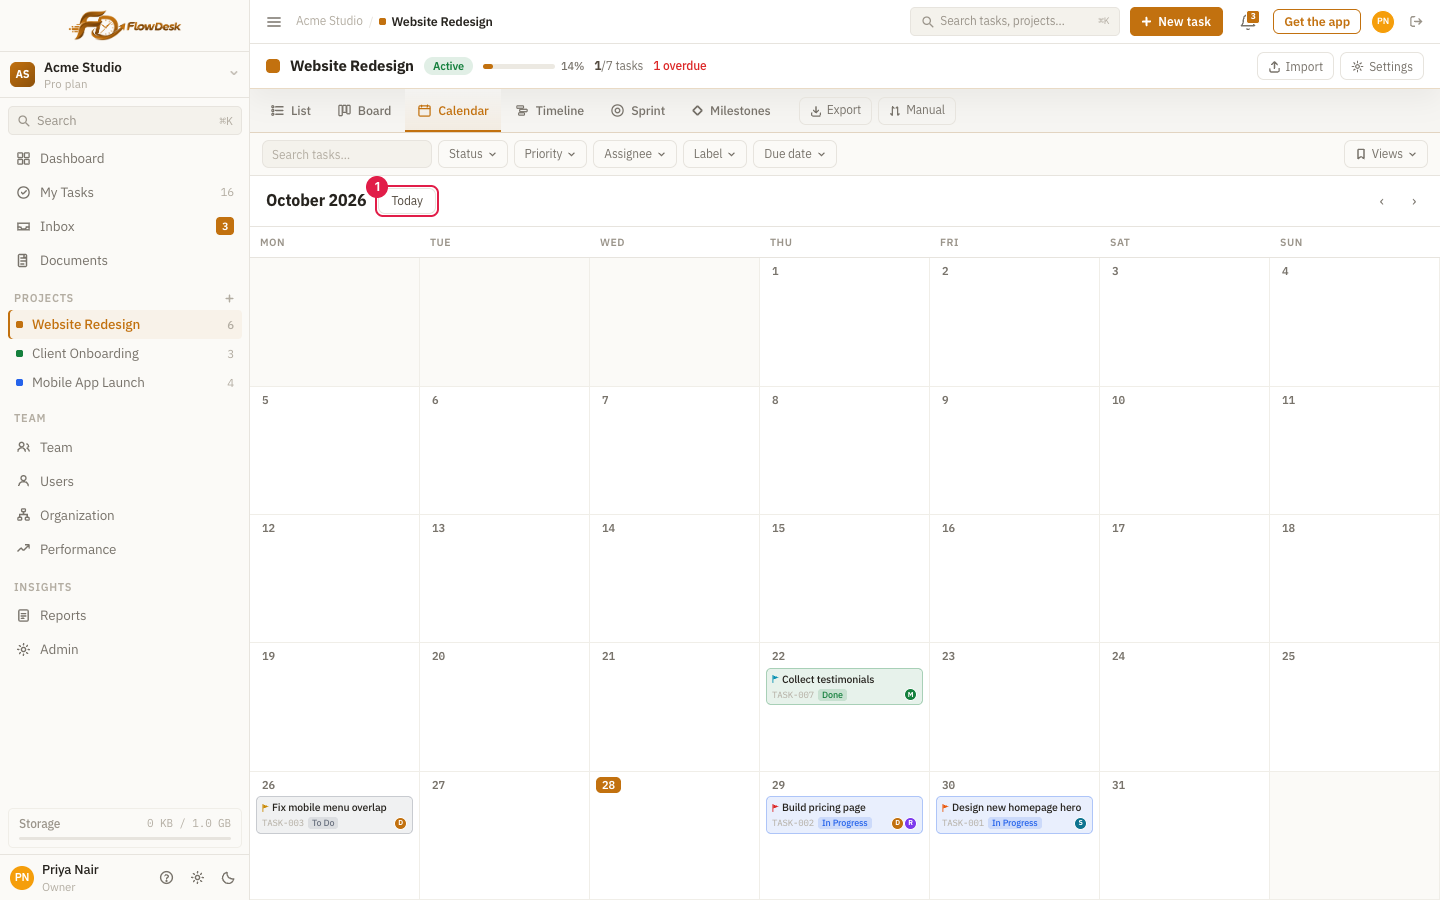
- 1Today: jump back to the current month
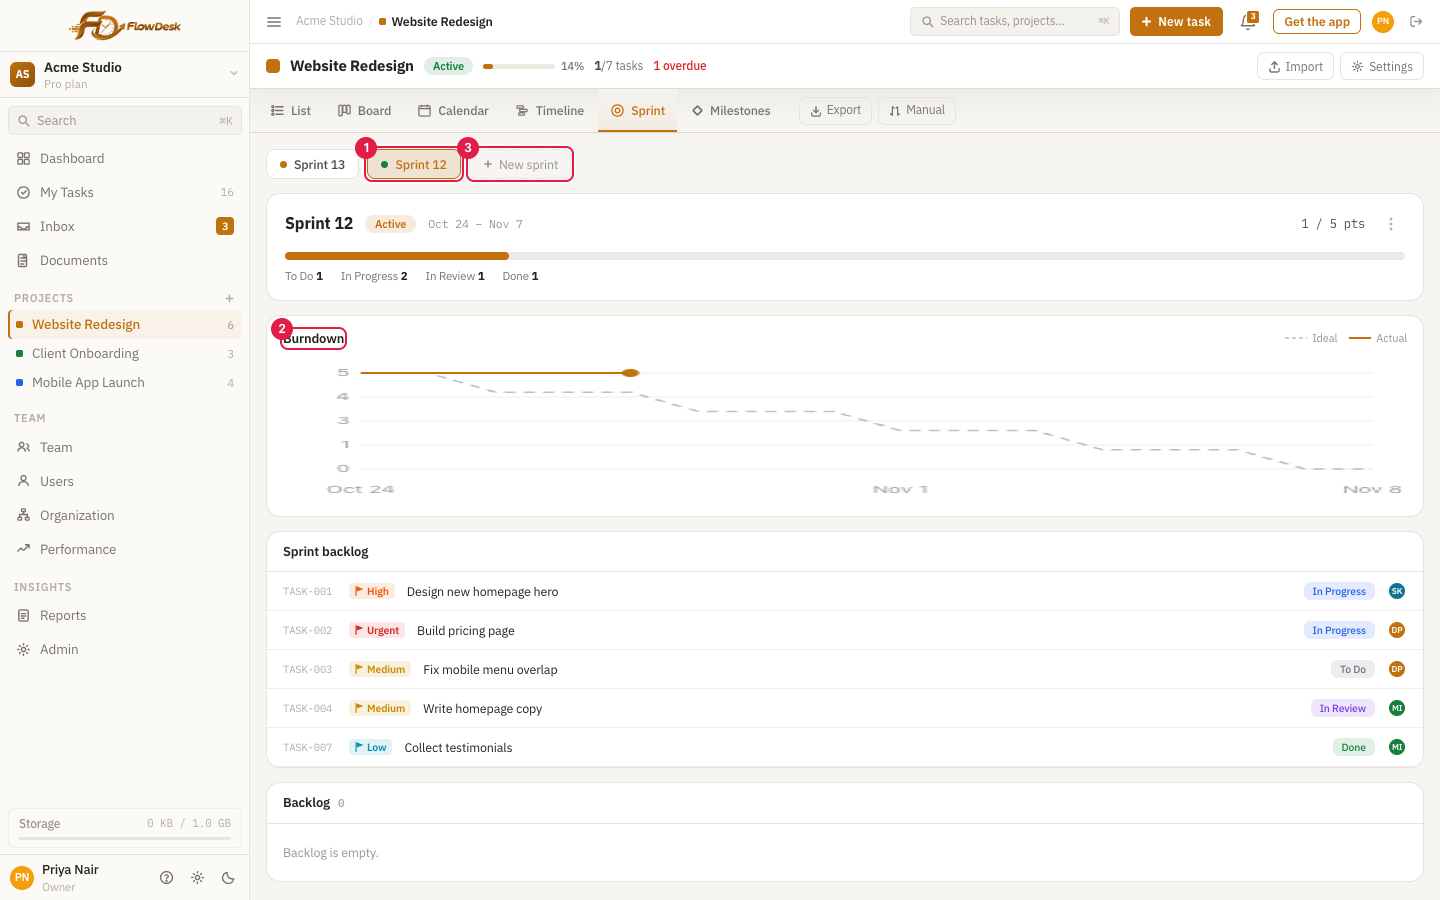
- 1Choose a sprint
- 2The burndown chart: ideal line versus actual progress
- 3Create a new sprint
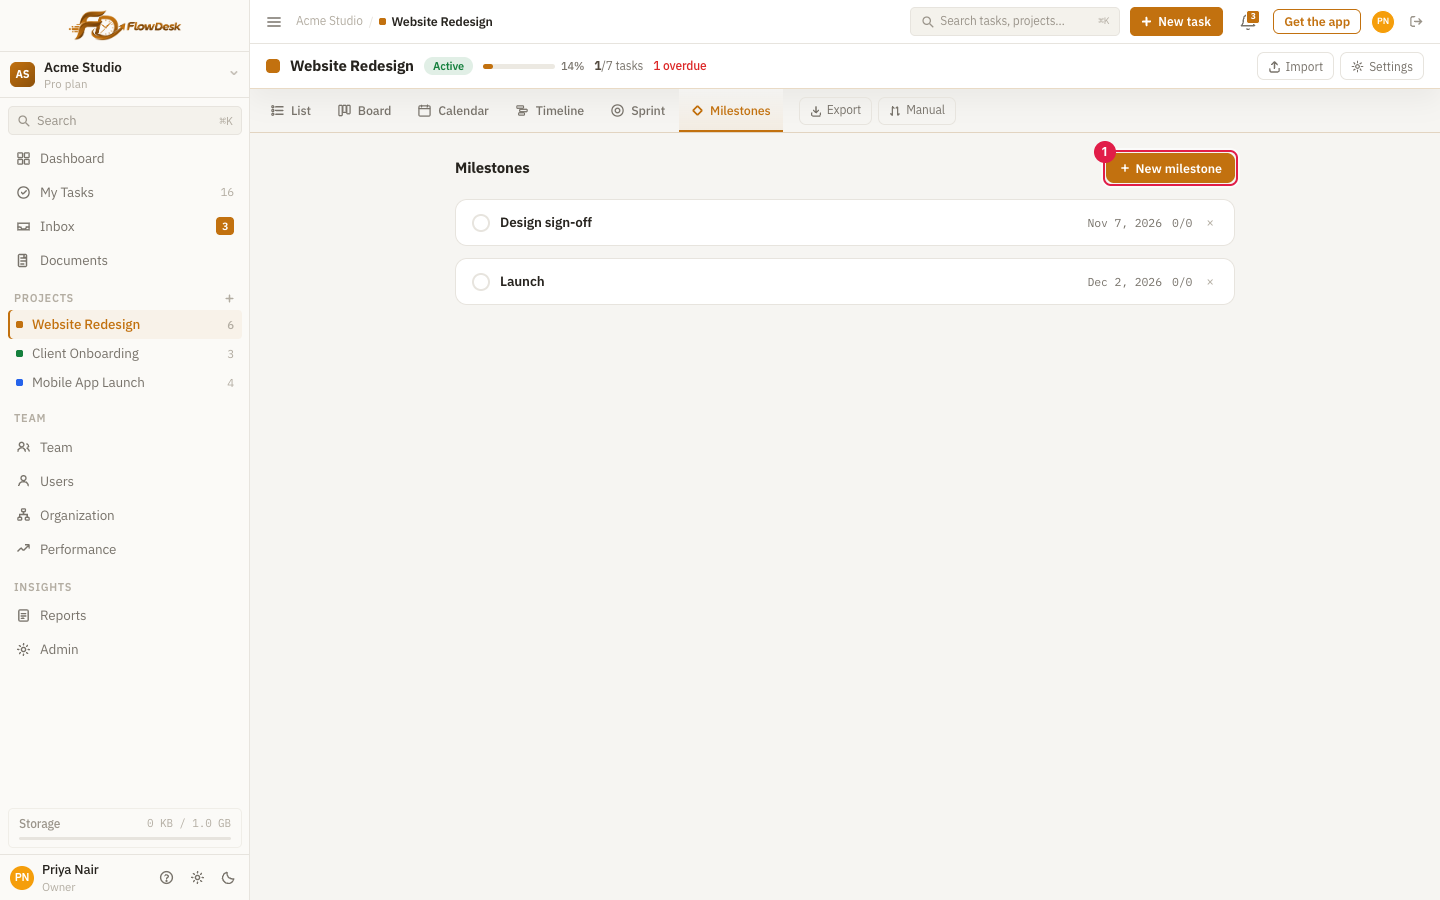
- 1Add a milestone
Filters, saved views and bulk edit
Filter tasks
The filter bar above the task list on a project page and on My Tasks narrows what you see. You can combine any of these:
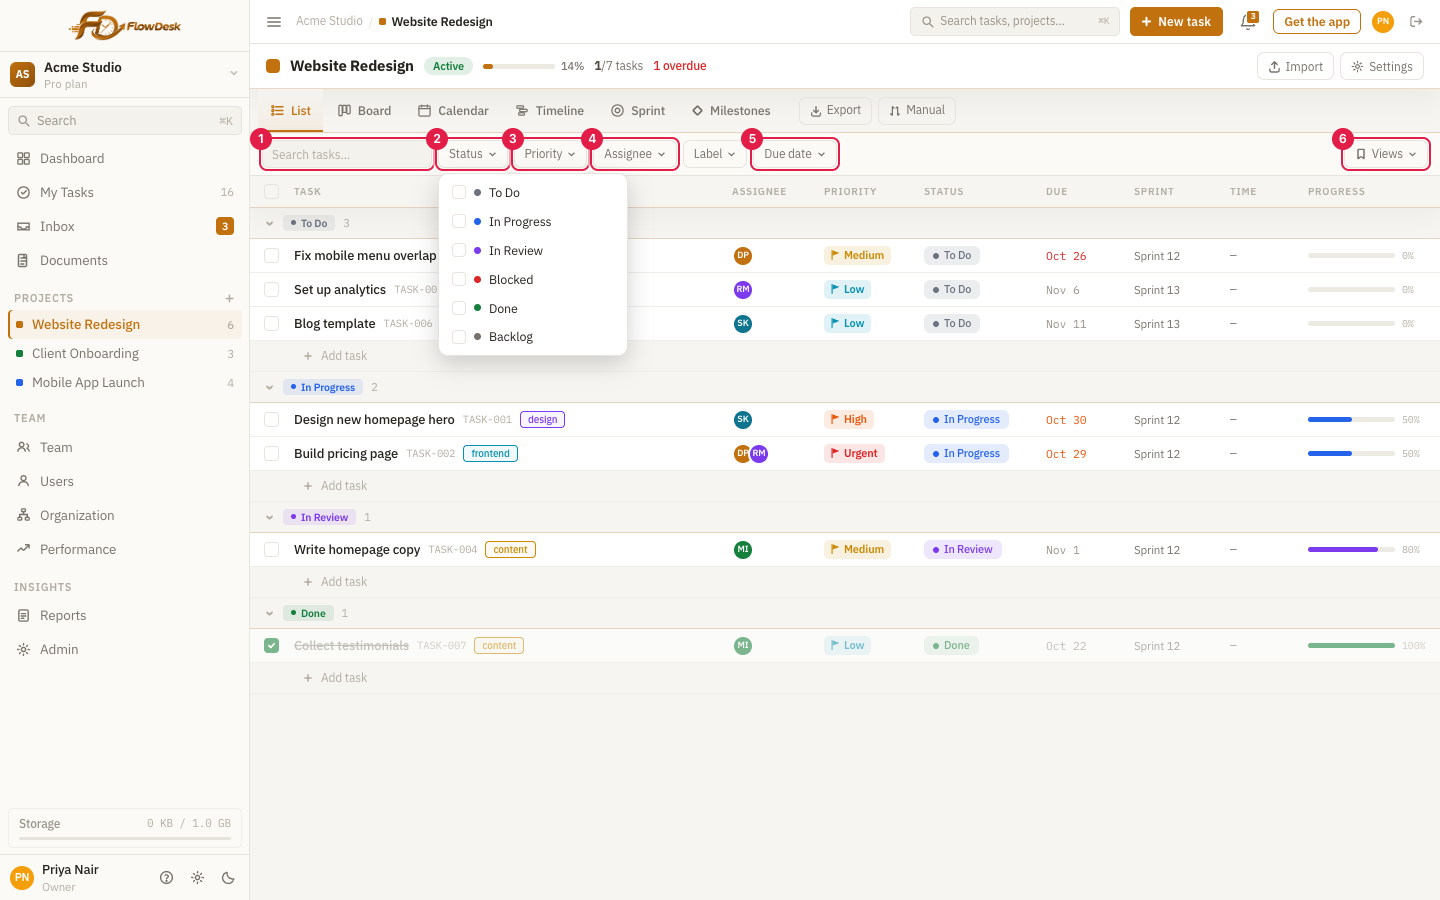
- 1Search by title or task key
- 2Status: tick one or more
- 3Priority
- 4Assignee: Me, Unassigned or specific people
- 5Due date: Overdue, Due today, Next 7 days or No due date
- 6Views: saved filter sets (see below)
- Label filters by label, and Project (on My Tasks only) by project.
- A badge on each filter shows how many options are selected.
- Select Clear all to start over.
Saved views
If you use the same filters again and again, save them as a view.
- Set up the filters (and sorting or grouping) the way you want.
- Open Views at the right end of the filter bar and choose Save current as new view.
- Type a name. Tick Share with workspace if colleagues should see it too.
- Next time, open Views and pick it. Choose Default view to go back to everything.
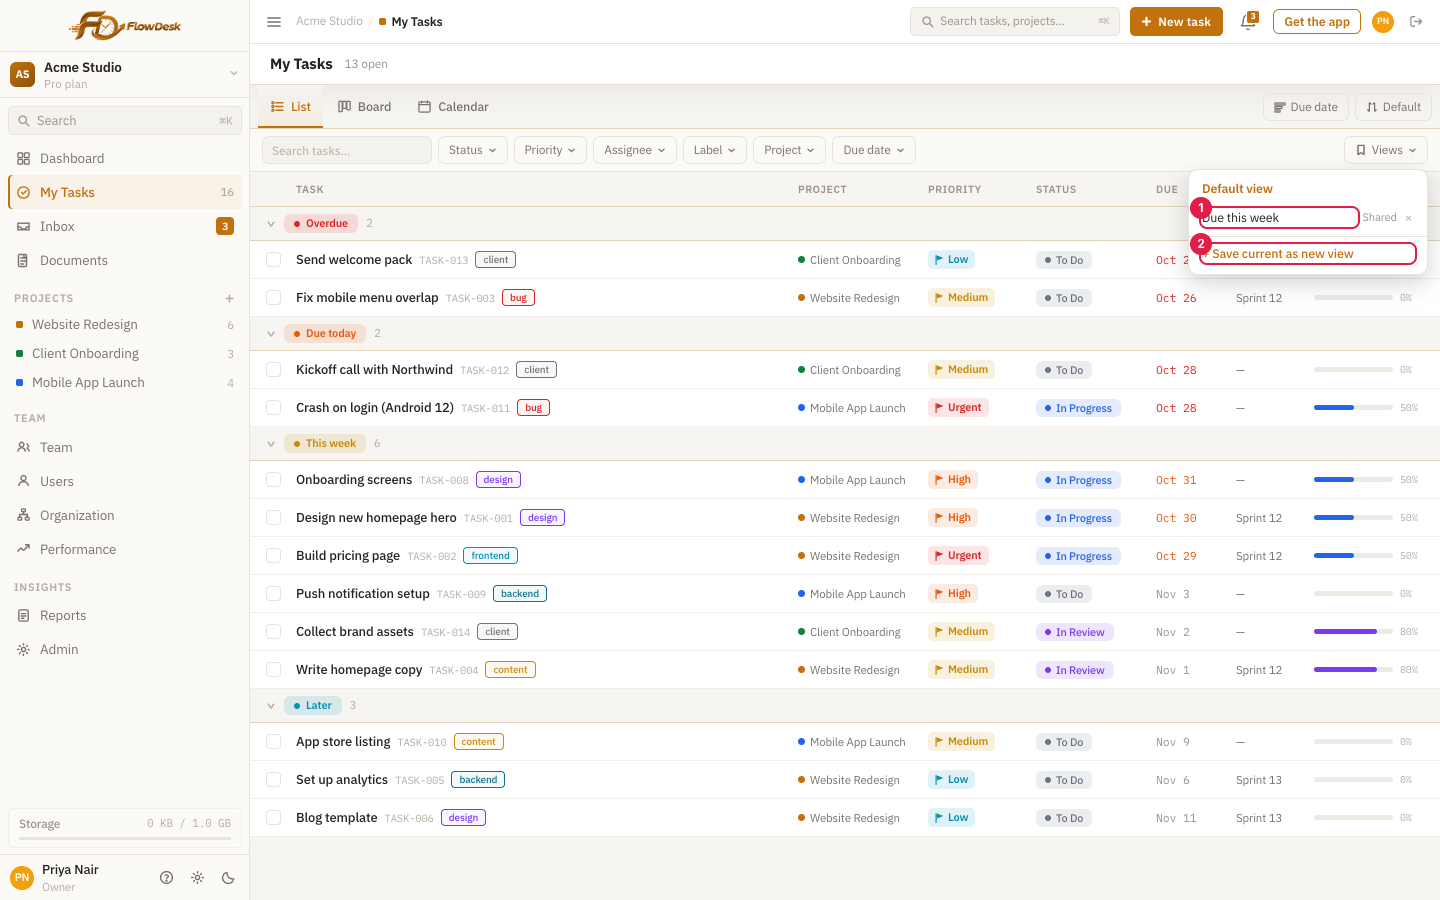
- 1A saved view. A "Shared" tag means colleagues can use it too; the x deletes it
- 2Save the current filters as a new view
To change a view you made, load it, adjust the filters and choose Update "name" with current. Views are kept separately for My Tasks and for each project. Guests cannot save views.
Bulk edit
In the List view, tick the box at the top left of the list to select every task, then untick any you want to leave out. Once something is selected, a box appears beside every task so you can tick or untick them one by one.
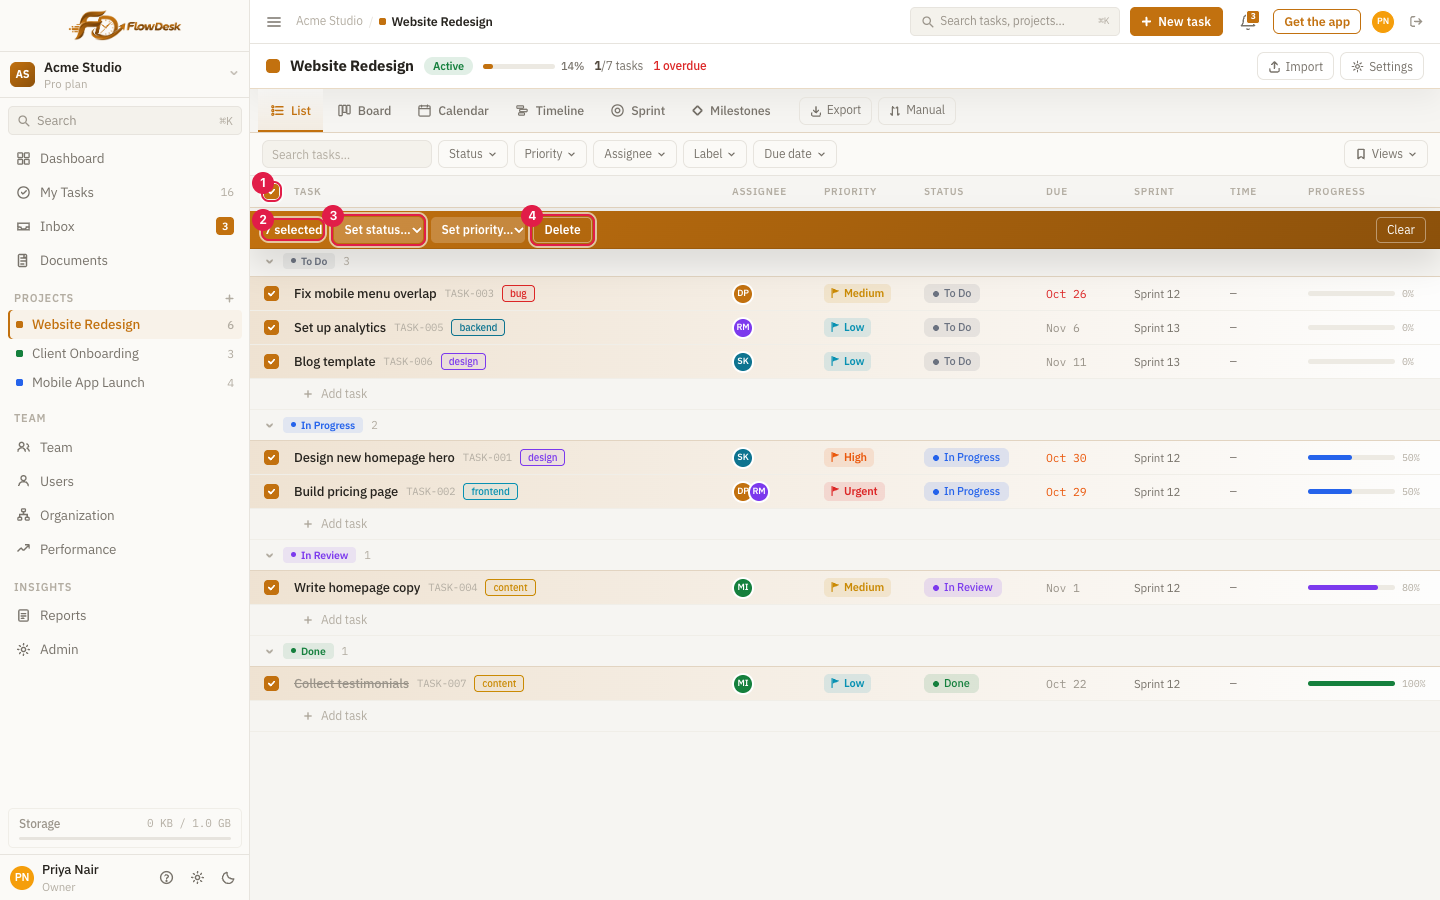
- 1Select all
- 2How many tasks are selected
- 3Set the status of all of them at once (Set priority works the same way)
- 4Delete all selected tasks (cannot be undone)
Chat and Inbox
Open Inbox to talk with your team. It has two tabs: Chat for conversations and Inbox for your notifications. Conversations are either channels (a topic for a group) or direct messages (one to one).
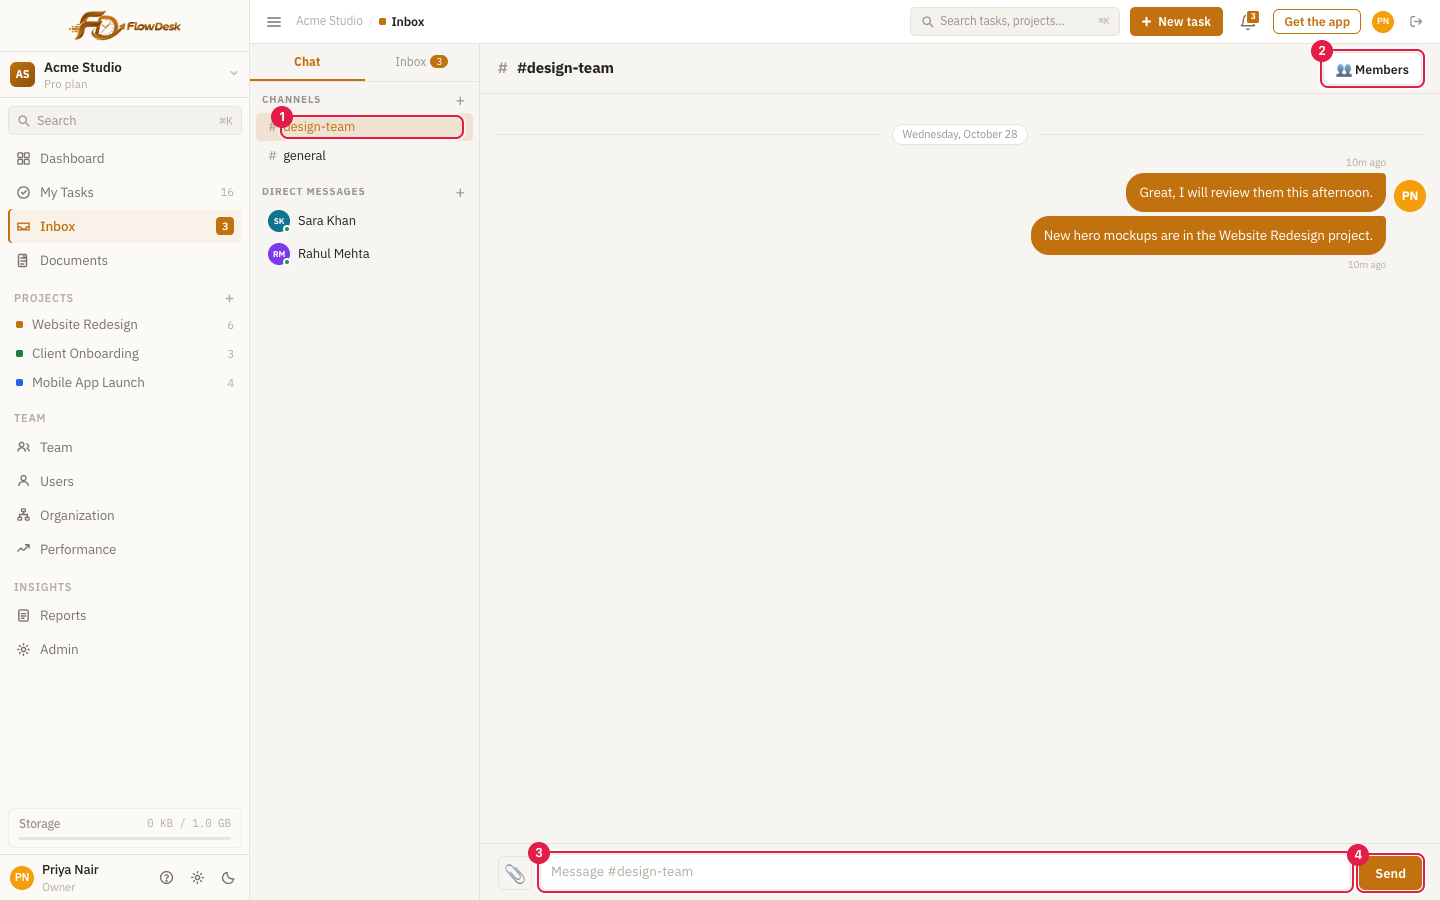
- 1Channels and direct messages are listed on the left
- 2Members: see who is in the channel
- 3Type a message here, or use the paperclip to attach a file
- 4Send (or press Enter)
Channels
- Everyone in the workspace is added to #general.
- Owners and admins create more channels with the + beside Channels. A channel can be private, so only people added to it can see it.
- Select Members at the top of a channel to see who is in it. Admins can add or remove people; anyone can leave a channel they joined.
Direct messages
Select + beside Direct Messages to open the New message window. Colleagues who are online are listed first. Type a name, job title or email to find someone, or use the arrow keys and Enter; select Online to show only people who are around. People you already chat with are marked In your chats. Past conversations stay in the list.
Sending messages
- Press Enter to send.
- Attach files with the paperclip, by dragging them anywhere onto the conversation, or by pasting a screenshot or copied image into the message box (Ctrl+V or Cmd+V). They also appear under Documents.
- React to a message with an emoji.
- Reply in a thread to keep a side discussion out of the main stream.
- Message info shows who has read a message and who has not yet.
- Choose Mark all read to clear unread counts.
Online and offline status
A small dot on a colleague's avatar shows whether they are around. Green means online and grey means offline. The same dots appear on the Team page. In a direct message the header also says Online or Last seen 5m ago.
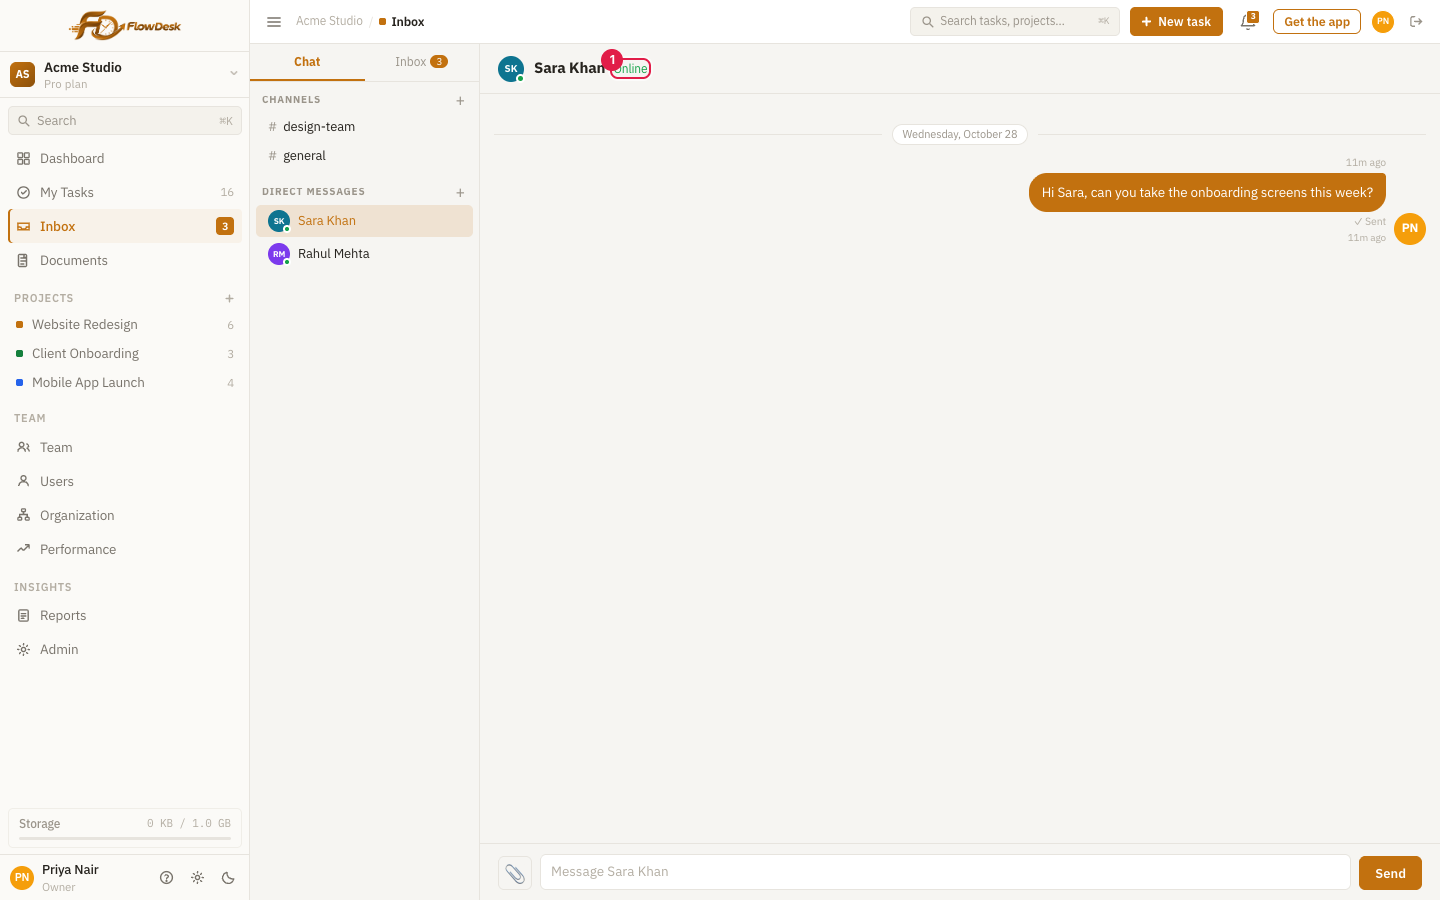
- 1Online: the header says so, and the avatar has a green dot
Someone counts as online while Flowdesk is open in their browser, or while the mobile app is open on their screen. It updates about every 30 seconds. Closing the browser tab or switching away from the app makes them appear offline after a minute or two.
Notifications and reminders
Flowdesk tells you about things that need your attention. The bell at the top of the screen shows a number when something is new. On the phone you also get push alerts.
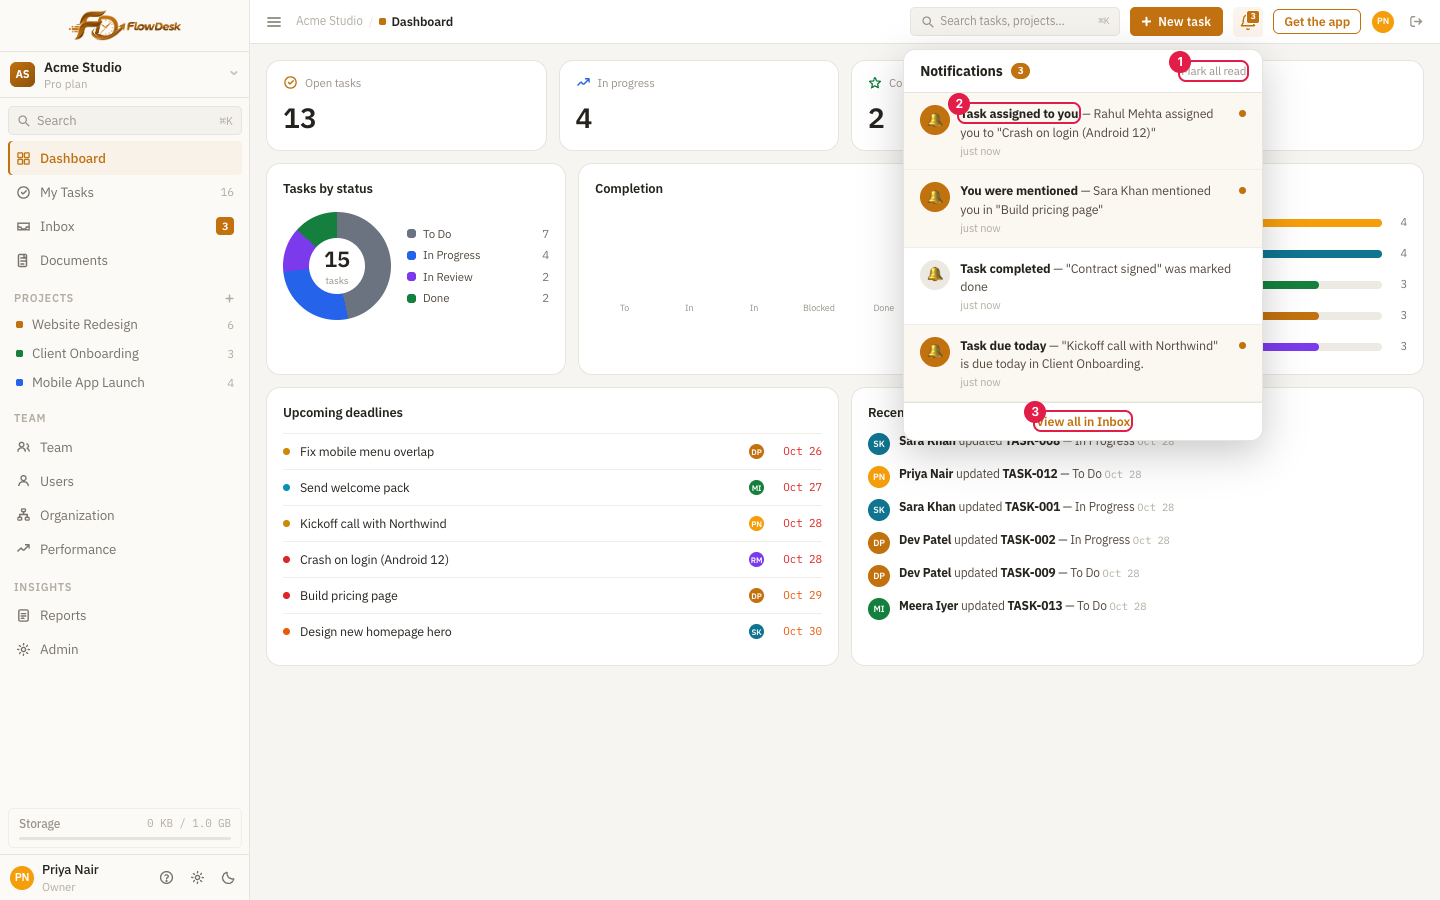
- 1Mark all read
- 2Select a notification to jump to the task or message
- 3View all in Inbox opens the full list
What you are notified about
- A task is assigned to you.
- Someone comments on a task you own.
- A task you created is marked done.
- A task's status changes.
- A sprint starts or ends.
- You are mentioned in a comment or message.
- Someone reacts to your message.
- A task is due today. A reminder is sent each morning for tasks due that day.
- An automation your admin set up notifies you.
Choose how you are told
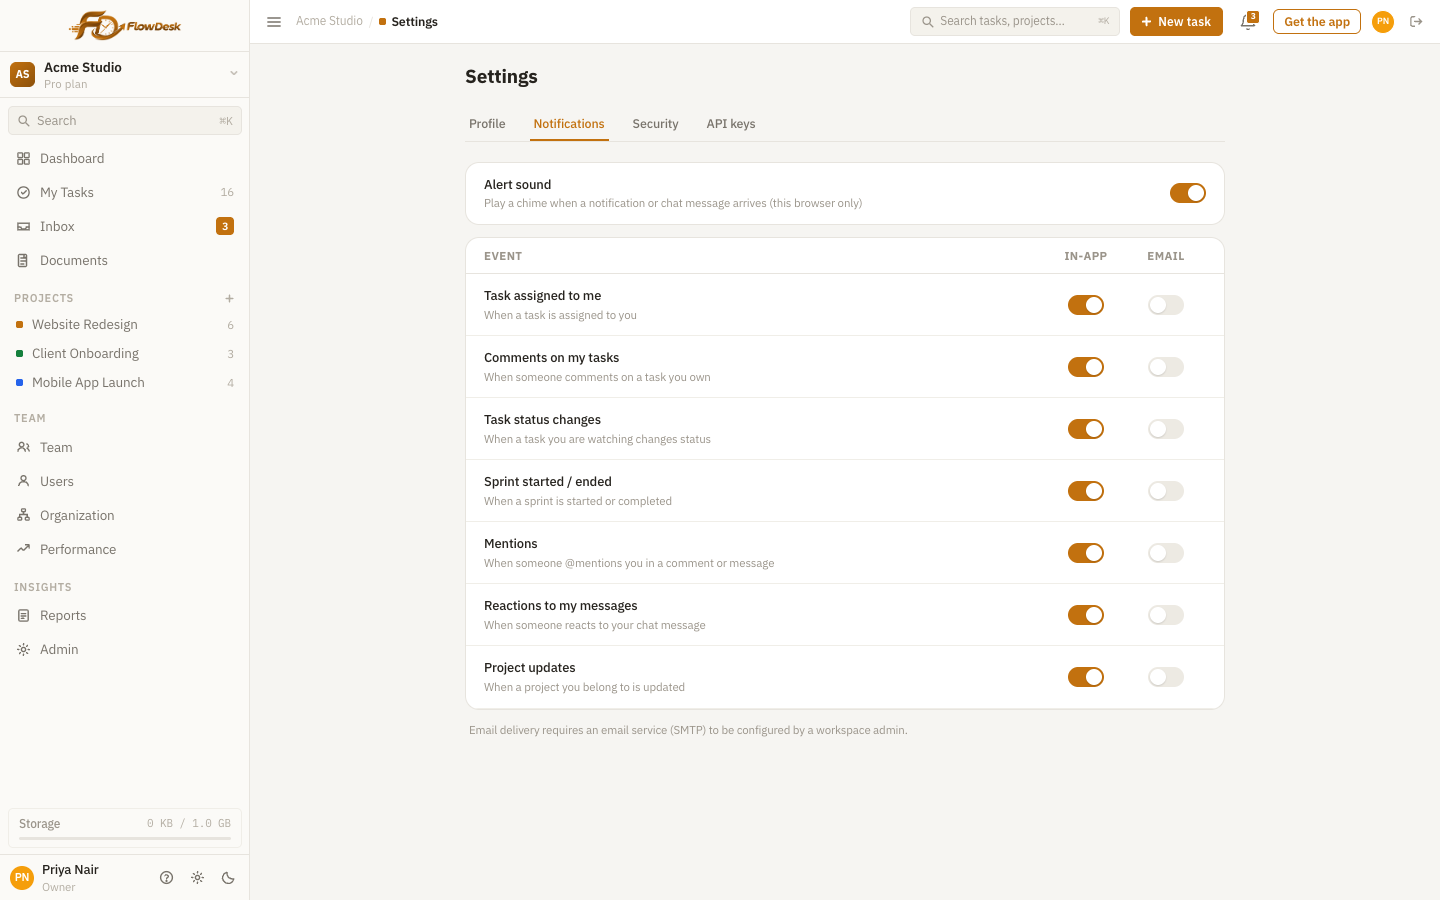
Go to Settings, then Notifications. For each event you can switch the in-app notification and the email on or off. Email is off by default, so switch on the events you want to receive by email. You can also turn the alert sound on or off; it plays a chime in that browser when something arrives.
Documents, reports and team pages
Documents
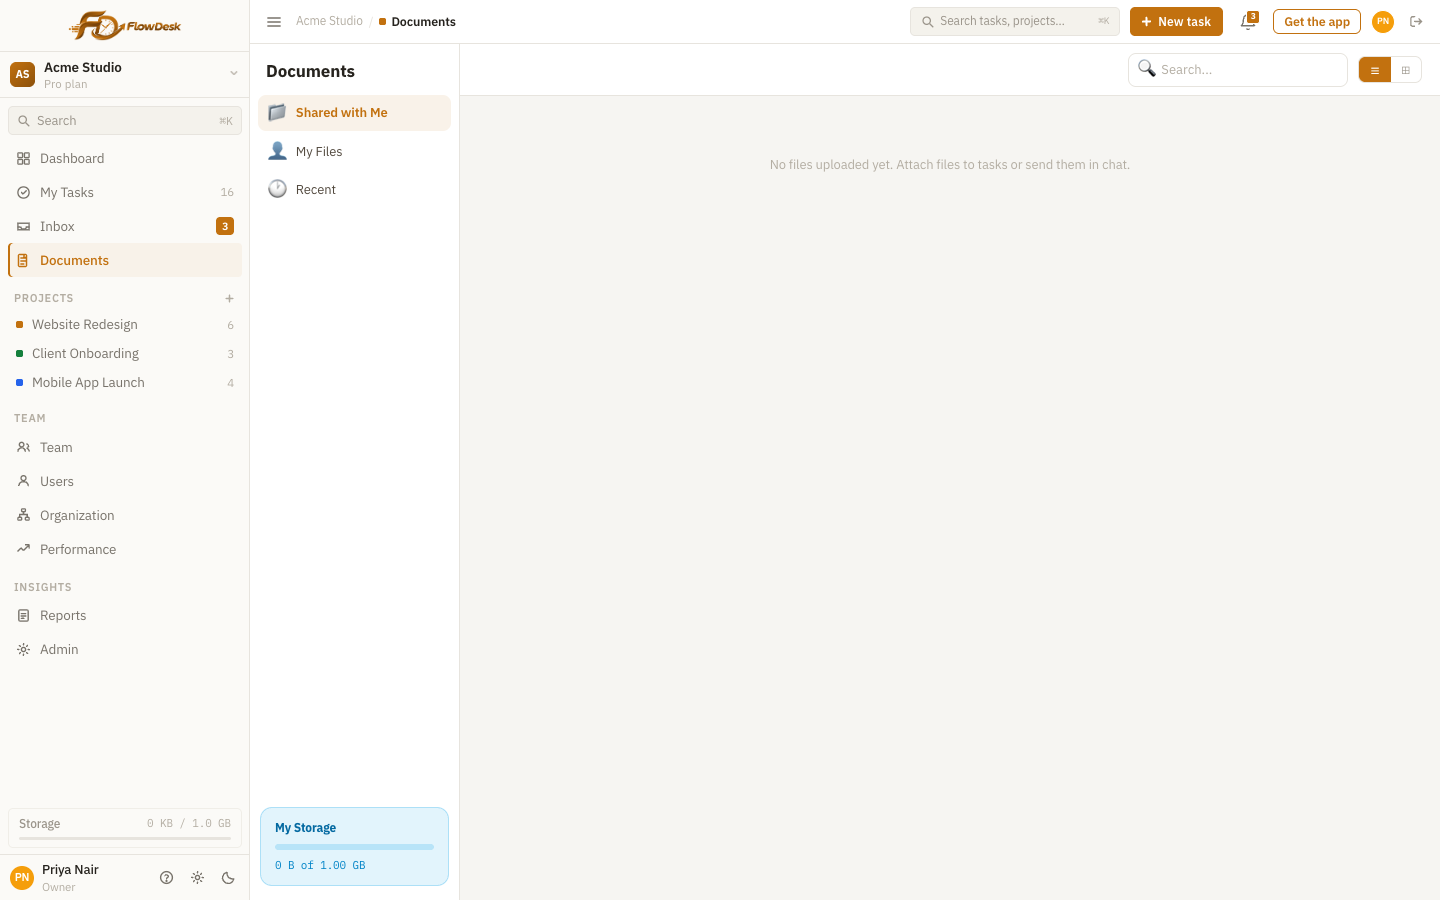
The Documents page lists the files attached to tasks and sent in chat. Use Shared with Me, My Files and Recent to move between lists, search by name, and switch between list and grid view. The box at the bottom shows how much storage you are using; the strip at the bottom of the sidebar shows the whole workspace and turns red when it is nearly full.
Team
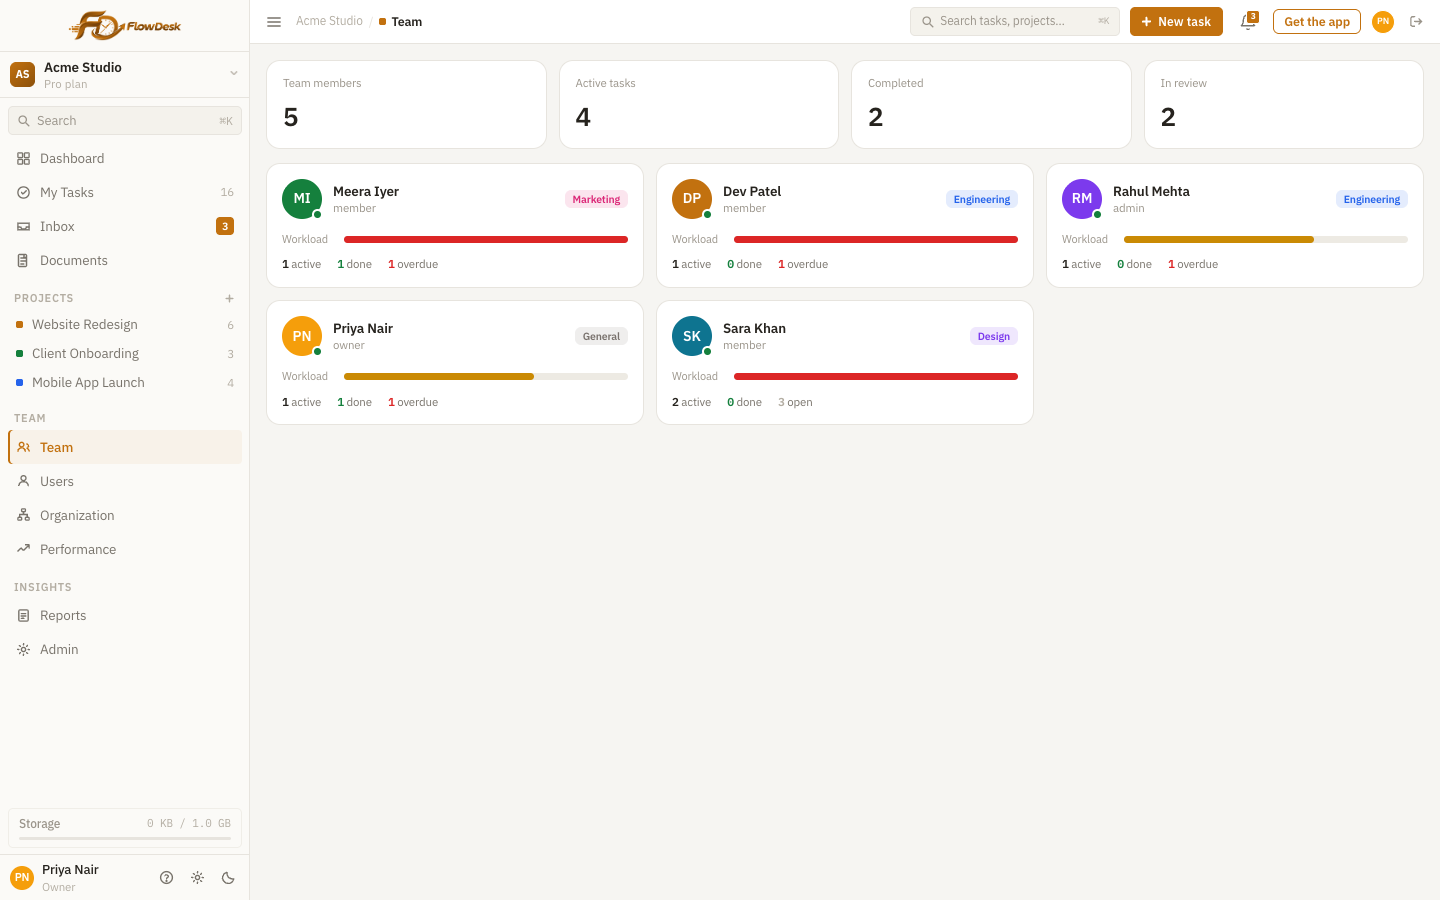
The Team page shows a card for everyone in the workspace with their department, role, a workload bar and counts of active, done and overdue tasks, so you can see who has capacity. A green dot on an avatar means the person is online.
Reports
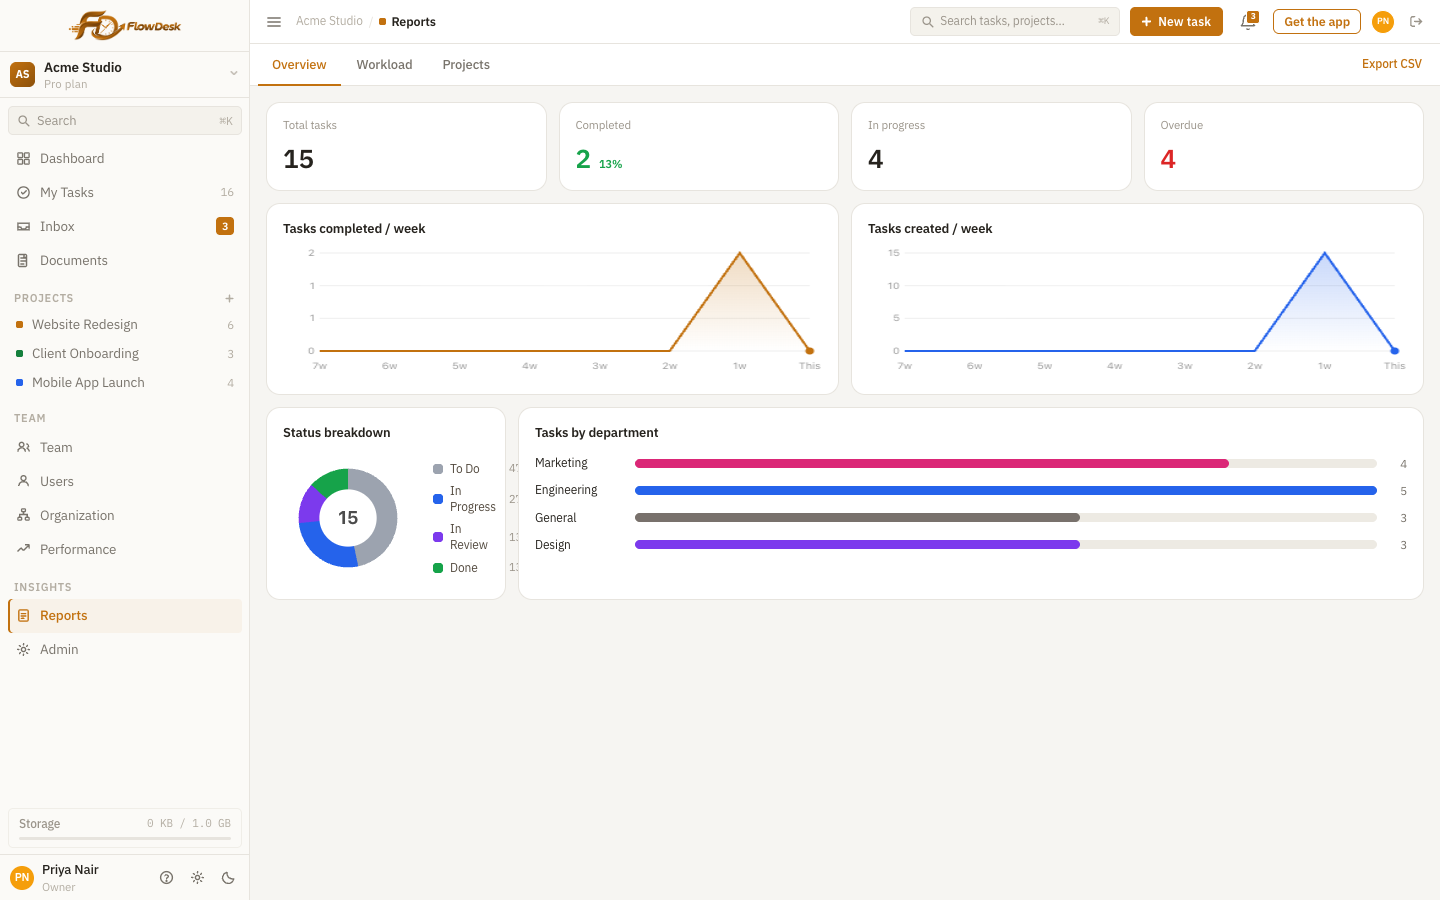
Owners and admins use Reports to follow progress. The Overview tab shows total, completed, in-progress and overdue tasks, tasks completed and created per week, a status breakdown and tasks by department. Workload shows open tasks per person and Projects shows each project's total, done, overdue and progress. Use Export CSV to take the numbers into a spreadsheet.
Performance and Organization
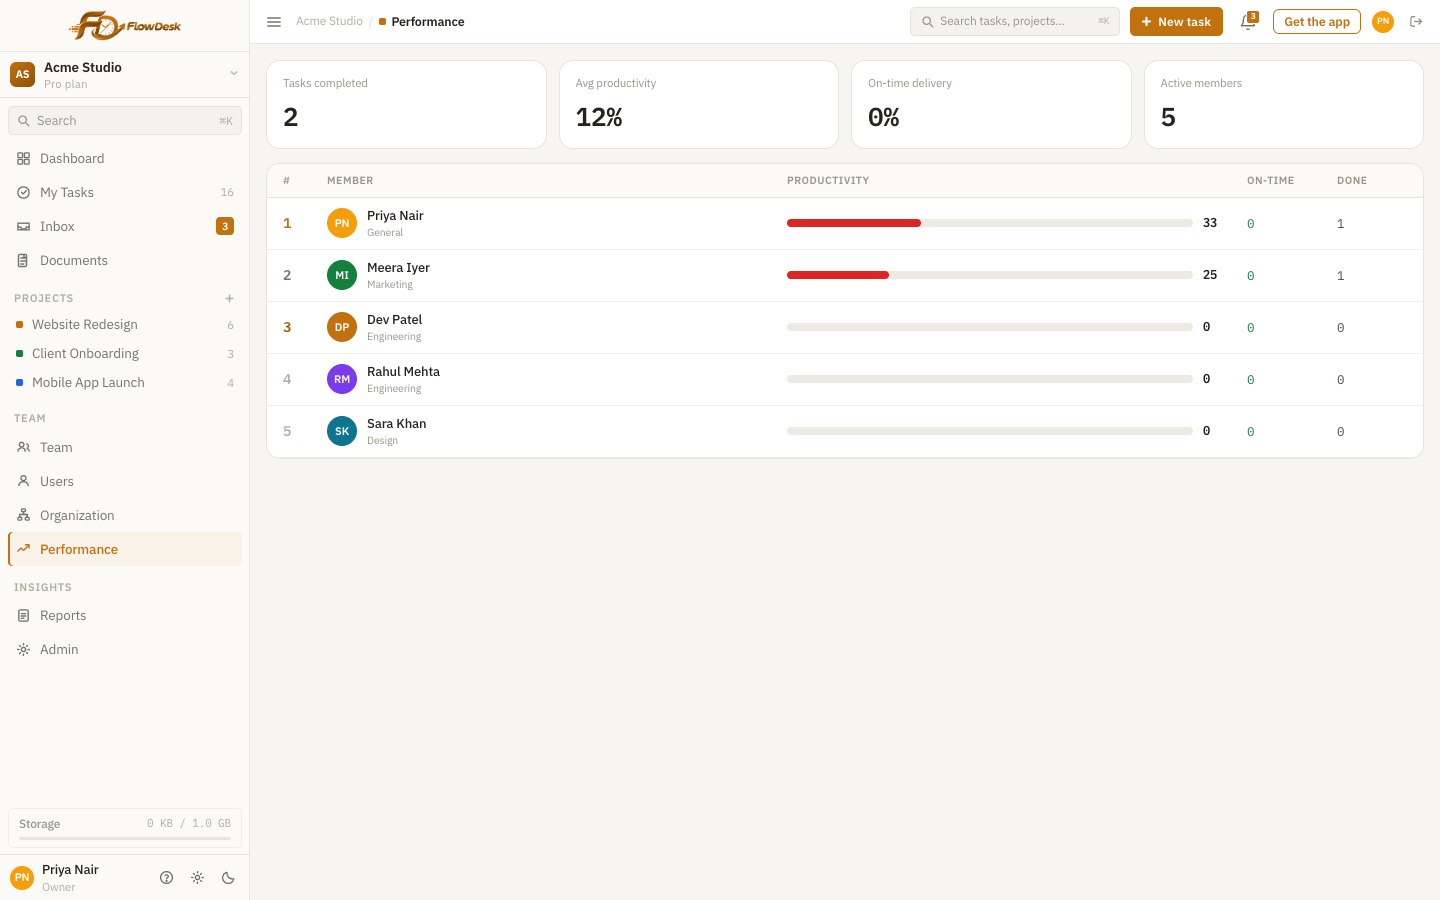
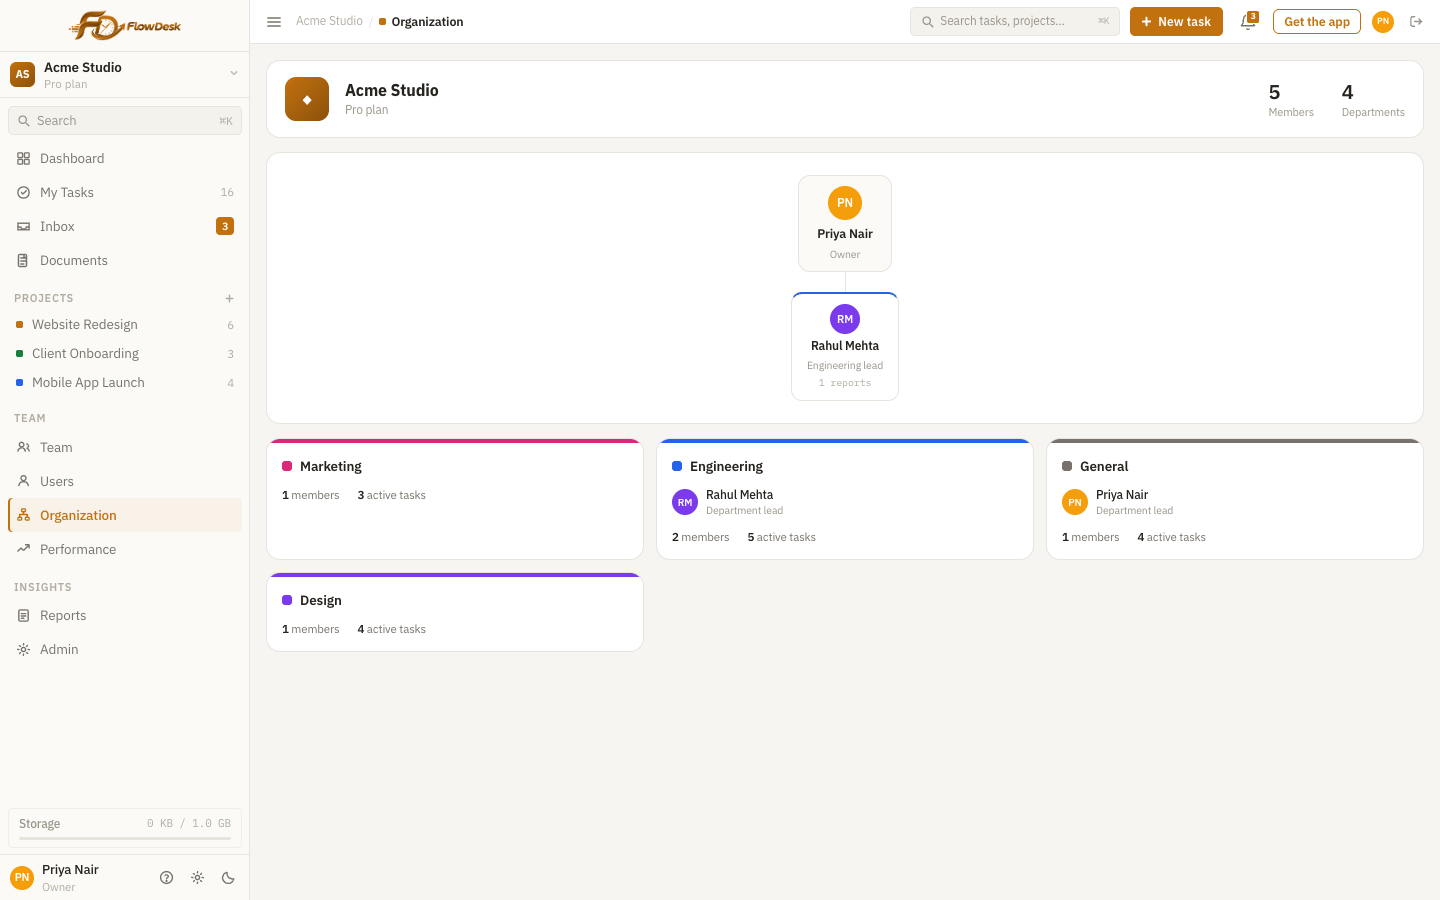
Performance (owners and admins) ranks members by productivity and shows tasks completed and on-time delivery. Organization shows the reporting structure, departments, who leads each one and how many members and active tasks each has.
Your profile and settings
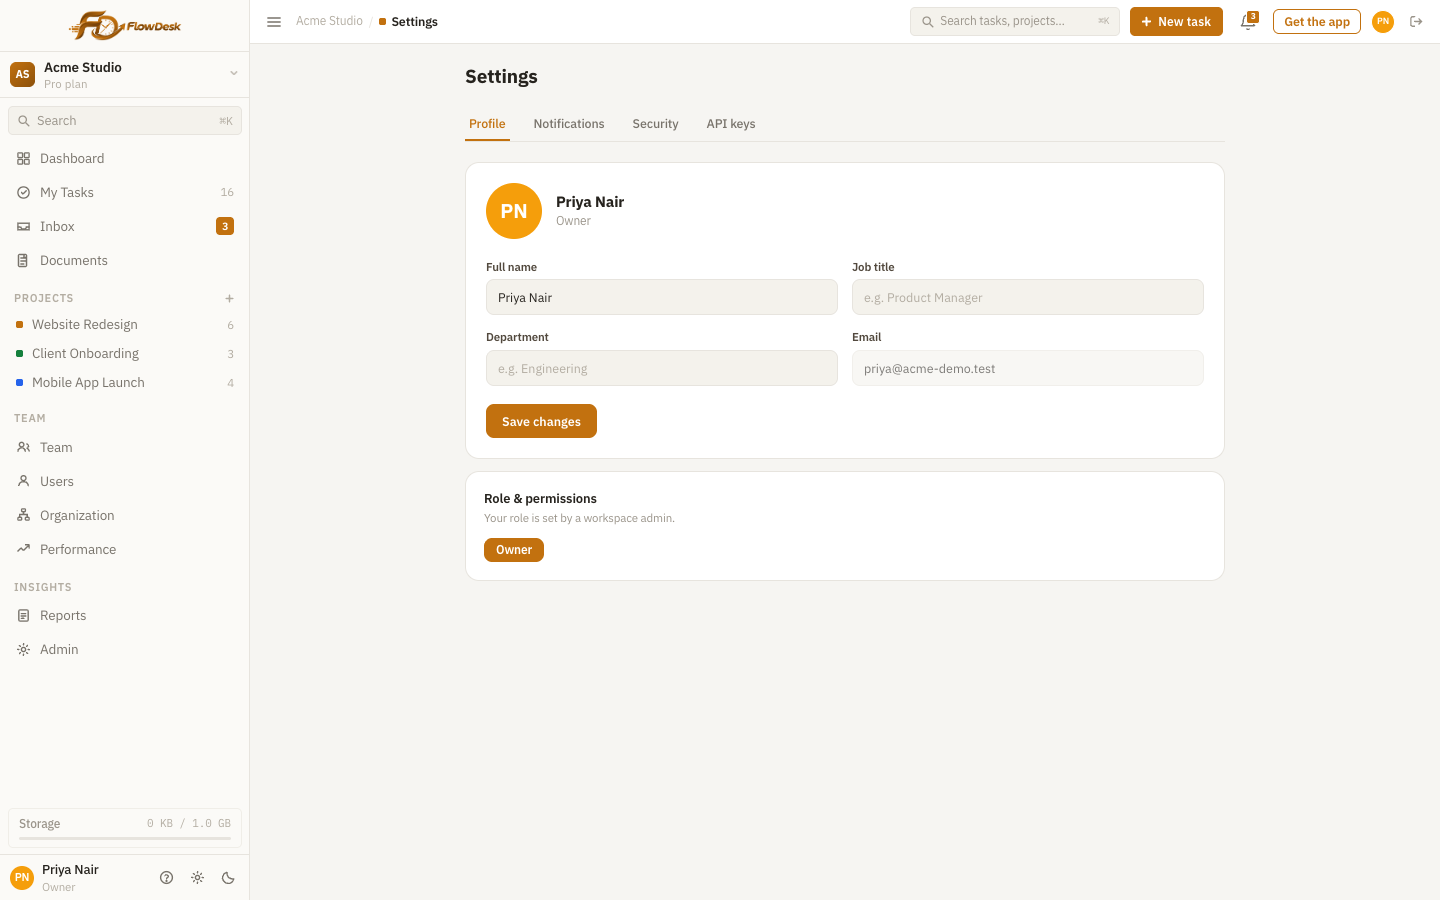
Select the gear icon at the bottom of the sidebar to open your settings. It has four tabs: Profile, Notifications, Security and API keys. The sun or moon icon next to the gear switches between light and dark mode.
Profile
Change your name, job title and department, then select Save changes. Your email address and role are shown; your role is set by a workspace admin.
Password, two-factor sign-in and sessions
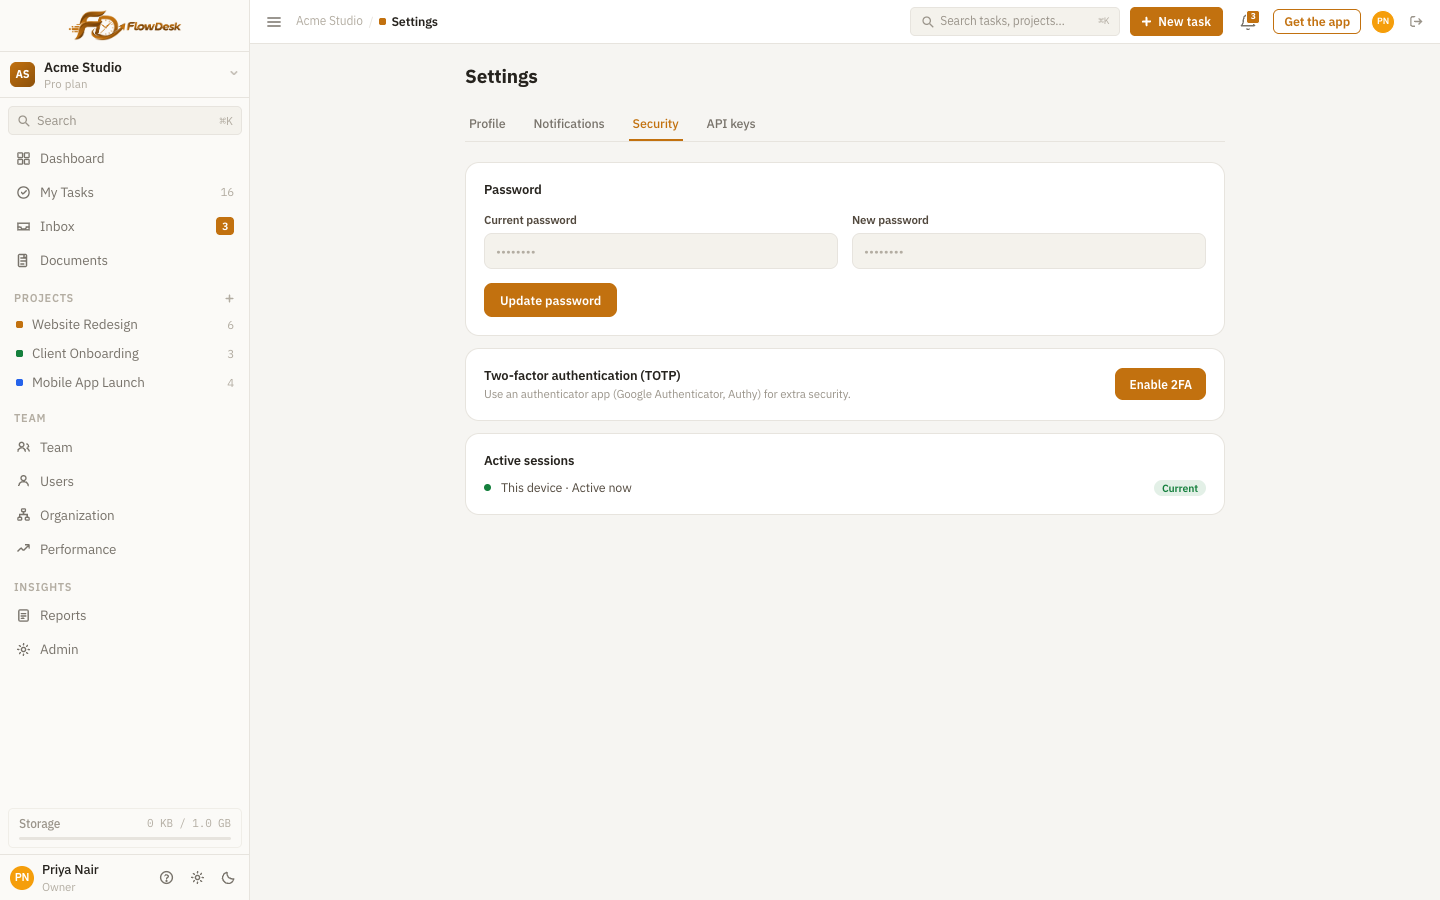
Under Security, enter your current password and a new one (at least 8 characters), then select Update password.
Two-factor sign-in asks for a code from your phone as well as your password, which keeps your account safe even if the password leaks.
- Choose Enable 2FA.
- Open an authenticator app (Google Authenticator, Microsoft Authenticator, Authy or similar) and scan the code or enter the secret shown.
- Type the 6-digit code from the app to confirm.
You can turn it off again with Disable 2FA. Active sessions lists where you are signed in; Revoke signs another device out.
API keys
The API keys tab lets you create a key so other tools can work with your Flowdesk data. Treat a key like a password: copy it when it is shown and revoke it when it is no longer needed.
For admins
Owners and adminsRoles
| Role | What they can do |
|---|---|
| Owner | Everything: manage users, edit tasks, view reports and billing, and the whole Admin page |
| Admin | Manage users, edit tasks, view Reports and Performance, create projects and channels |
| Member | Edit tasks, chat and share files |
| Viewer | Read-only access to work |
| Guest | Limited access for outsiders such as clients; cannot create tasks or save views. Needs the Business plan |
Owners can also define custom roles with their own permissions under Roles & permissions on the Admin page (Business plan and above).
Invite people
- Open Users and choose Invite user.
- Enter the email address. For a new person also enter their full name. Choose a role and department.
- Select Send invite.
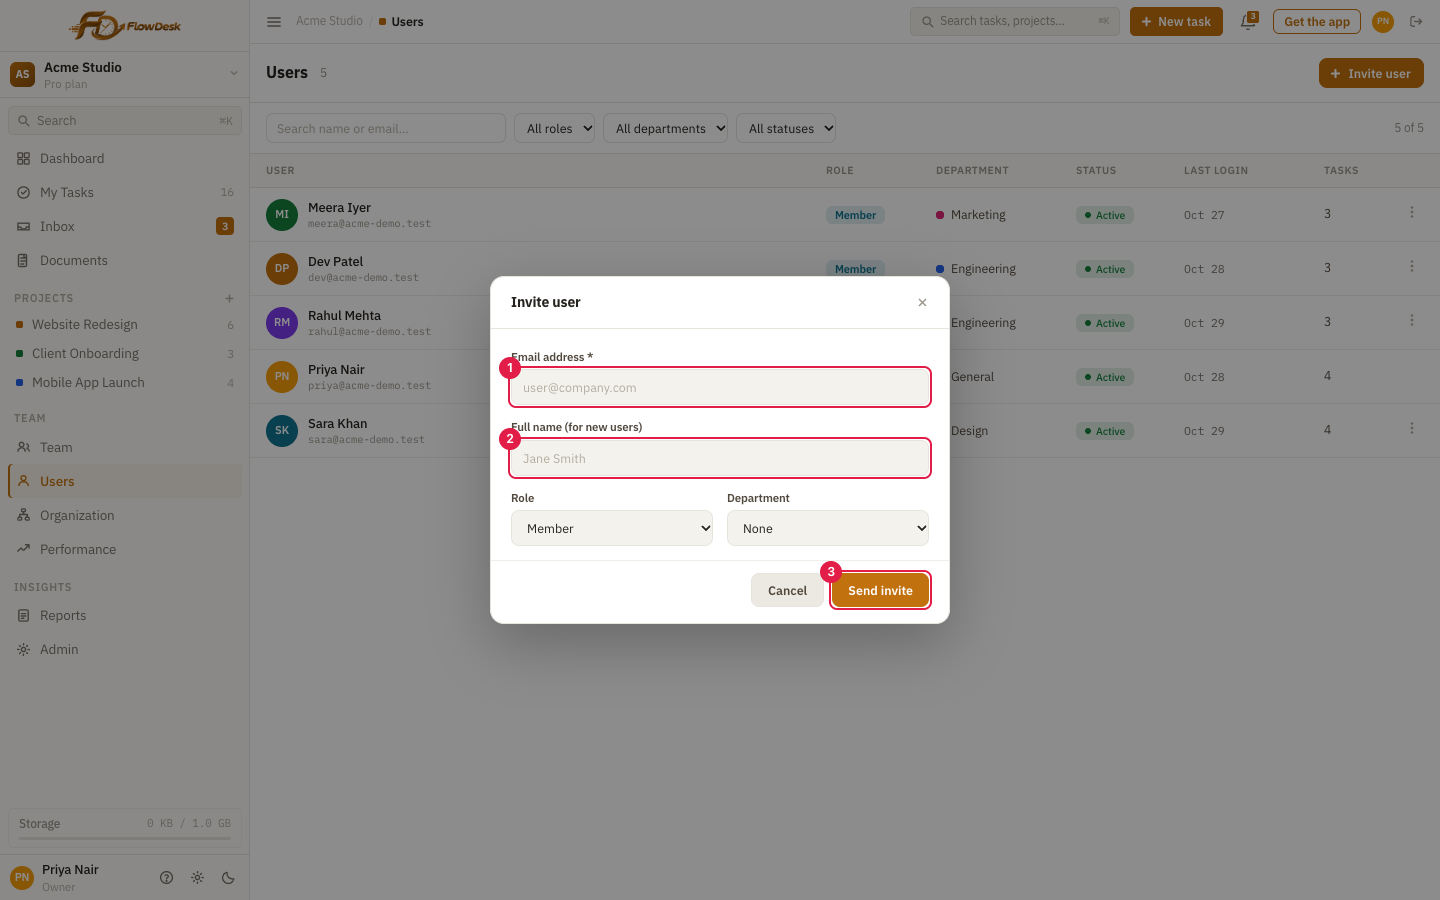
- 1Email address (required)
- 2Full name, needed only for people without an account yet
- 3Send invite
New people receive an email with a Set your password button. It is valid for 7 days. Nobody sets or sees a password for them. If your workspace has no email configured, the portal shows a one-time link that you copy and send yourself. People who already have a Flowdesk account are simply added and notified. The free plan is limited to 5 members; see Billing on the Admin page to upgrade.
Manage people
The Users page lists everyone with their role, department, status, last login and number of tasks. Search by name or email, and filter by role, department and status. The three-dot menu on a row lets you edit a person, change their role, suspend or reactivate them, or remove them from the workspace. View as this user shows the portal as that person sees it, which helps when someone cannot find something.
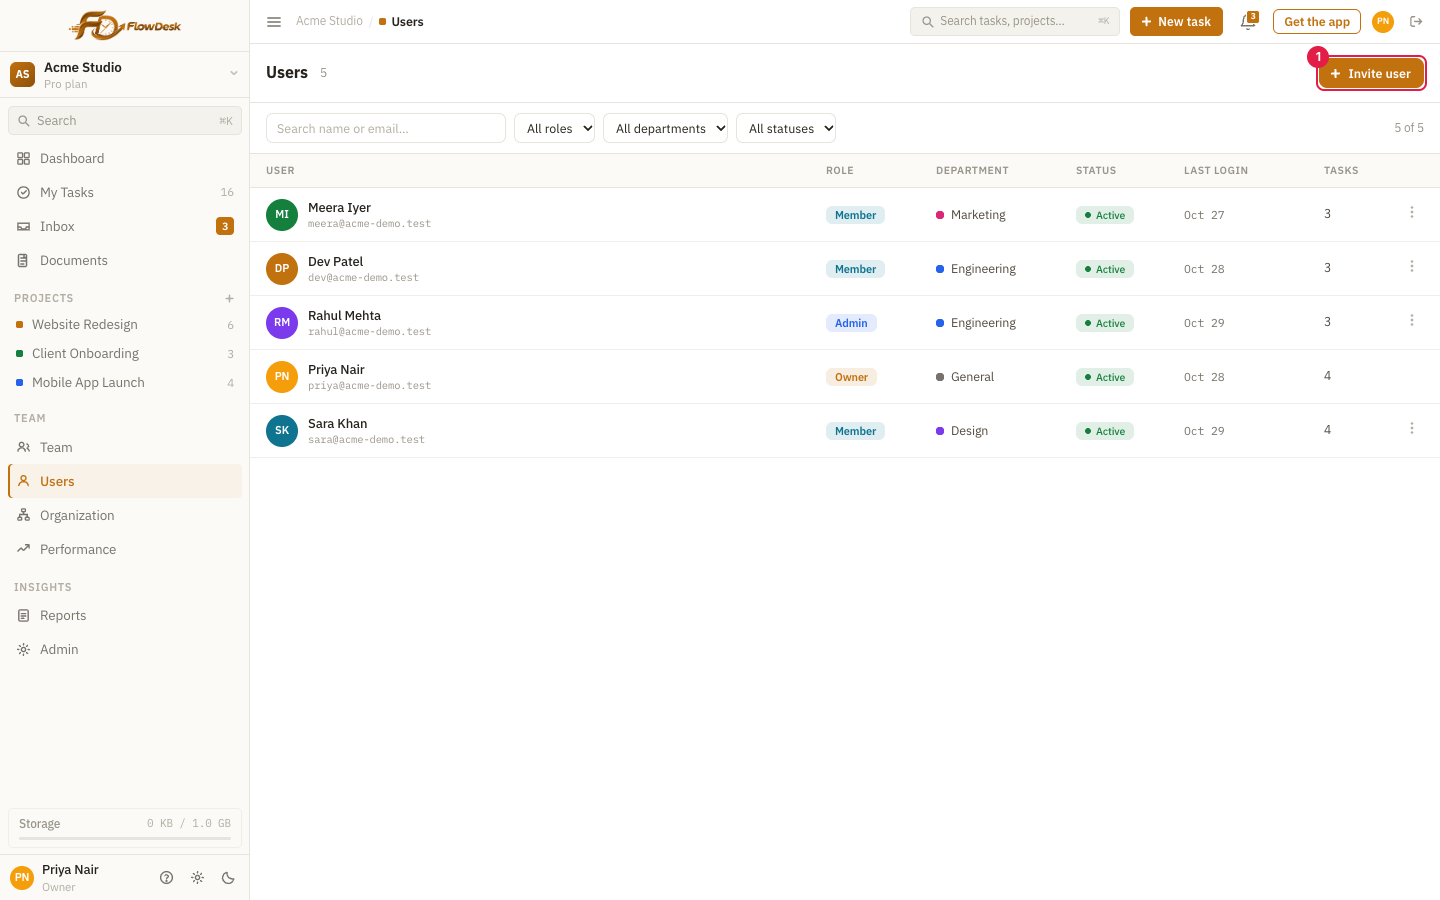
- 1Invite user
Workspace settings (owners)
The Admin page is where owners configure the workspace:
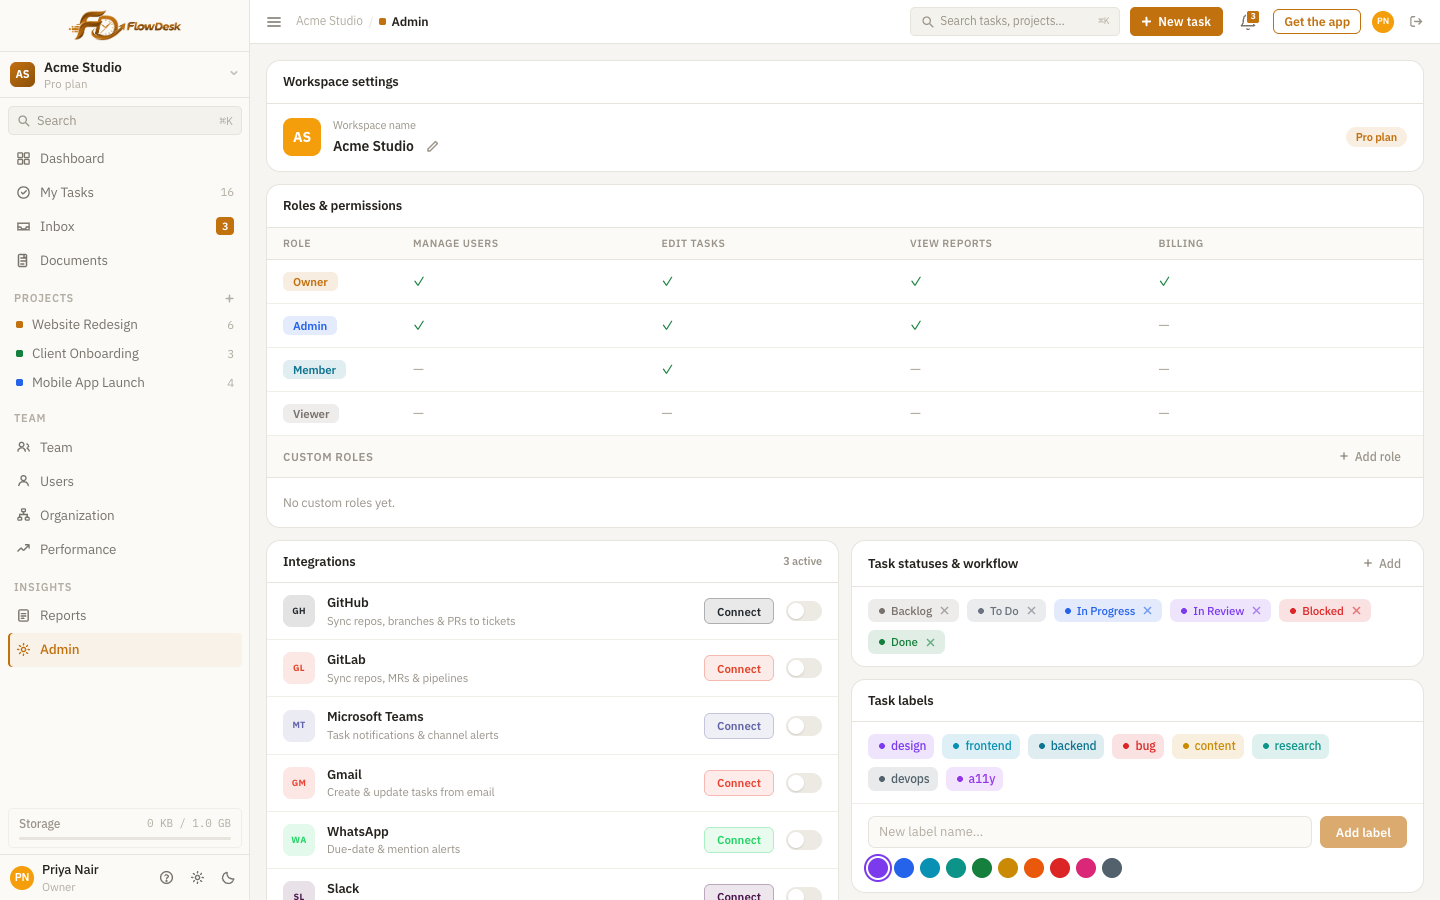
- Workspace settings: the workspace name (select the pencil to rename).
- Roles & permissions: what each role can do, plus custom roles.
- Integrations: switch on and Connect Email (SMTP), Slack, Microsoft Teams, GitHub, GitLab and HRMS sync, among others listed there.
- Task statuses & workflow: add, remove or drag to reorder the stages tasks move through.
- Task labels: the shared list of labels. Type a name, pick a colour and select Add label.
- Custom fields: extra fields on every task. Choose text, number, dropdown, checkbox, date or link.
- Task templates: ready-made tasks people can start from. Save one from a task's detail panel.
- Automations: see below.
- Billing: your plan, seats used and invoices.
- Single sign-on (SAML), the activity log, and importing tasks from a file or Jira or employees from your HRMS.
Email setup
Invitation emails and notification emails are sent through the mail account you connect under Integrations, Email (SMTP). Until it is connected, the portal cannot send email, but everything else works.
Automations
Automations do routine steps for you. On the Admin page, find Automations and choose + New automation:
- Give it a name, for example "Send finished work to QA".
- Choose When: a task changes status (to a specific status or any), or a task is created. Limit it to one project or leave it on all projects.
- Choose Then: assign to a person, set priority, move to a status, add a label, or notify someone.
- Select Save automation.
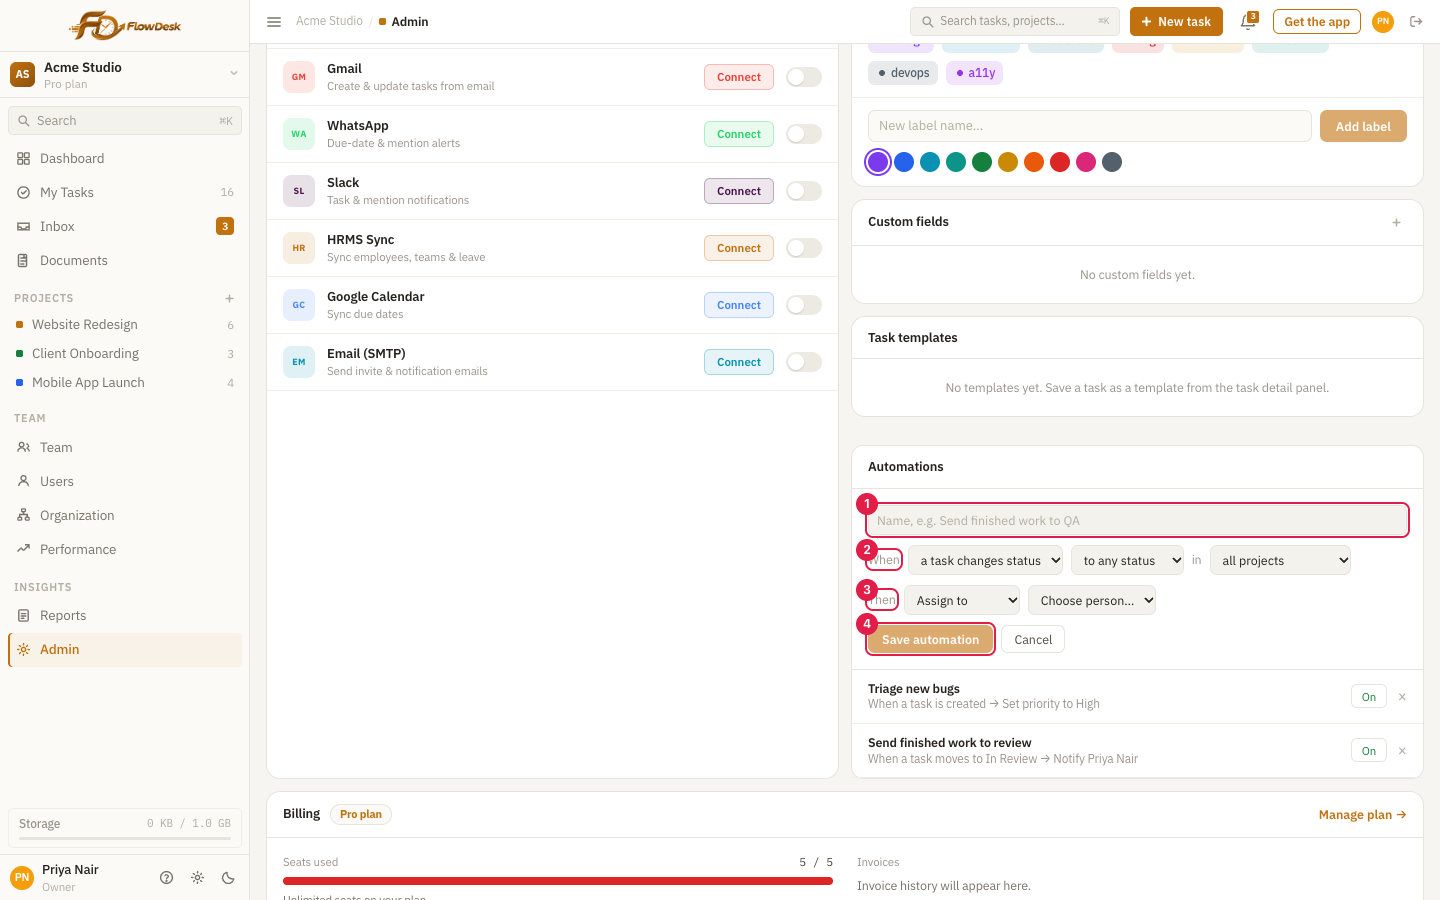
- 1A name for the rule
- 2When: what triggers it, and in which projects
- 3Then: what happens
- 4Save automation
Each rule is listed with an On switch you can turn off at any time and an x to delete it. An automation never triggers another automation, so rules cannot loop. To change a rule, delete it and create it again.
Plans and limits
Each workspace is on a plan. Things your plan does not include show a padlock; selecting one opens the plans screen. Your workspace owner can see how much of each limit is used under Billing on the Admin page.
| Free | Pro | Business | Enterprise | |
|---|---|---|---|---|
| Projects | Up to 3 active | Unlimited | Unlimited | Unlimited |
| Members | Up to 5 | Unlimited | Unlimited | Unlimited |
| Storage | 1 GB | 50 GB | 200 GB | Custom |
| Task views | List and Board | All: Calendar, Timeline, Sprints, Milestones | All | All |
| Chat and direct messages | Yes | Yes | Yes | Yes |
| Automations | No | Yes | Yes | Yes |
| Integrations (email, Slack, Teams, GitHub, GitLab) | No | Yes | Yes | Yes |
| Reports and Performance pages | No | No | Yes | Yes |
| Custom roles and guest access | No | No | Yes | Yes |
| Single sign-on (SAML) and the activity log | No | No | No | Yes |
- If you reach a limit, for example 3 projects on Free, you can still use what you have. Only adding more is blocked until you upgrade.
- If a workspace moves to a smaller plan, nothing is deleted. Anything above the new limits stays, but new ones cannot be added.
- Free workspaces cannot connect their own email, so invitation emails are not sent. The admin is shown a link to copy and send instead.
The mobile app
The Flowdesk app puts your tasks and chat on your phone. Choose Get the app at the top of the portal for the download and a QR code, or open it from your phone at the portal address followed by /mobile.
Install on Android
- On your phone, open the Mobile App page and tap Download (or scan the QR code).
- Open the downloaded file to install it. If asked, allow installs from your browser. This is a one-time prompt.
- Open Flowdesk and sign in with your usual email and password.
Use it on iPhone or iPad
A native iOS app is coming soon. Until then:
- Open the portal in Safari and sign in.
- Tap the Share button, then Add to Home Screen.
- Tap Add. Flowdesk opens full screen with its own icon.
What you can do
- Today: your day at a glance, swipe to complete a task, quick add and full task editing.
- Tasks and Projects: filter, sort and group, and open any task to edit it.
- Chat: channels, direct messages, reactions and file sharing, with live updates.
- Inbox and push alerts for assignments, mentions and due dates, even when the app is closed.
- Timer: start a timer on a task and log the time when you stop.
Working offline
Without a connection the app shows You're offline, showing saved data and lets you keep reading your tasks. Changes you make are stored and sent automatically when you are back online. If something cannot be done offline, the app says No internet connection.
Stay up to date and secure
When a new version is ready, a banner says Update available. Tap Update and open the file when it has downloaded; your login and data are kept. In the app's settings you can turn on App lock, which asks for your fingerprint, face or screen lock each time you reopen Flowdesk.
Troubleshooting and FAQ
| Problem | What to try |
|---|---|
| My invitation link does not work | It works once and lasts 7 days. Use Forgot password on the sign-in page, or ask your admin to invite you again. |
| I cannot sign in | Check the email address, then use Forgot password. After several wrong attempts wait a few minutes. If you use two-factor sign-in, check the time on your phone is correct. |
| I do not see a project or task | You may not be a member of that workspace or project. Check the workspace name at the top of the sidebar, then ask your admin. Filters can also hide tasks: select Clear all. |
| I cannot create a task, project or channel | Guests cannot create tasks. Only owners and admins create projects and channels. On the Free plan you can have 3 active projects. Ask your admin to change your role, or upgrade the plan, if you need more. |
| A tab or page shows a padlock | Your workspace's plan does not include it. Select it to see which plan does, or ask your workspace owner to upgrade. |
| I get no emails | Check spam. Email notifications are off until you switch them on under Settings, then Notifications. Your admin must also have connected email for the workspace. |
| A colleague shows as offline but is working | Status shows online only while Flowdesk is open in their browser or on their phone screen. It may take up to two minutes to change. |
| The app says "No internet connection" | Check your Wi-Fi or mobile data and try again. Your tasks stay readable and edits are sent when you are back online. |
| Storage is almost full | Ask your admin to remove files you no longer need or to upgrade the plan. |
| I lost my phone with two-factor codes | Contact your workspace owner for help getting back into your account. |
Still stuck? Contact your workspace admin, who can also see the portal as you see it.